1. Εισαγωγή
This manual provides instructions for the installation, operation, and maintenance of your AT&T EL51403 DECT 6.0 Cordless Home Phone System. This system includes a base unit and four cordless handsets, designed for clear communication and ease of use in your home or office environment.
Key features include DECT 6.0 technology for interference-free communication, a simulated full-duplex handset speakerphone, a backlit LCD display, a lighted keypad, and Caller ID/Call Waiting functionality.
2. Τι υπάρχει στο κουτί
Βεβαιωθείτε ότι το πακέτο σας περιέχει τα ακόλουθα στοιχεία:
- Μονάδα βάσης
- 4 Ακουστικά
- 3 Adaptors (for charging cradles)
- 4 πακέτα μπαταριών
- Καλώδιο τηλεφωνικής γραμμής
- Οδηγός γρήγορης εκκίνησης

Εικόνα: Πάνωview of the AT&T EL51403 4-handset cordless phone system, showing the main base unit with one handset and three additional charging cradles with their respective handsets.
3. Ρύθμιση
3.1. Τοποθέτηση μπαταρίας
- Ανοίξτε το κάλυμμα της θήκης μπαταριών στο πίσω μέρος κάθε ακουστικού.
- Συνδέστε καλά το βύσμα της μπαταρίας στην υποδοχή μέσα στο διαμέρισμα.
- Place the battery pack with the label UP into the compartment.
- Σύρετε το κάλυμμα της θήκης μπαταριών πίσω στη θέση του μέχρι να κάνει κλικ.
3.2. Connecting the Base Unit and Charging Cradles
- Plug the large end of the base unit power adapter into an electrical outlet.
- Plug the small end of the base unit power adapter into the power jack on the back of the base unit.
- Plug one end of the telephone line cord into the telephone jack on the back of the base unit.
- Συνδέστε το άλλο άκρο του καλωδίου τηλεφωνικής γραμμής σε μια πρίζα τηλεφώνου.
- For each additional handset, plug the power adapter into an electrical outlet and the charging cradle.
3.3. Αρχική φόρτιση
Place each handset in its respective base unit or charging cradle. The CHARGE light on the handset will illuminate. Allow the handsets to charge for at least 16 hours before initial use to ensure optimal battery performance.
4. Οδηγίες λειτουργίας
4.1. Πραγματοποίηση και απάντηση κλήσεων
- Για να πραγματοποιήσετε μια κλήση: Τύπος ΤΗΛΕΦΩΝΟ / FLASHκαι, στη συνέχεια, καλέστε τον αριθμό.
- Για να απαντήσετε σε μια κλήση: Όταν χτυπήσει το τηλέφωνο, πατήστε ΤΗΛΕΦΩΝΟ / FLASH or any dialing key (0-9, *, #).
- Για να τερματίσετε μια κλήση: Τύπος ΑΠΕΝΕΡΓΟΠΟΙΗΣΗ/ΑΚΥΡΩΣΗ or place the handset back in the base/charger.
4.2. Χρήση του ηχείου
Κατά τη διάρκεια μιας κλήσης, πατήστε το ΟΜΙΛΗΤΗΣ button to activate the speakerphone. Press it again to return to normal handset mode.
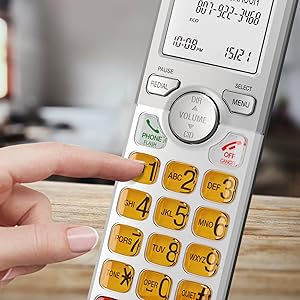
Image: A cordless handset on its base, with the speakerphone function active, illustrating a simulated full-duplex conversation between two individuals.
4.3. Ρύθμιση έντασης ήχου
Κατά τη διάρκεια μιας κλήσης, πατήστε ΤΟΜΟΣ (DIR/CID) προς τα πάνω ή προς τα κάτω για να ρυθμίσετε την ένταση ακρόασης.
4.4. Phonebook Directory
The phonebook can store up to 50 names and numbers. To access, add, or edit entries:
- Τύπος ΜΕΝΟΥ/ΕΠΙΛΟΓΗ όταν το ακουστικό είναι αδρανές.
- Scroll to "Phonebook" and press ΜΕΝΟΥ/ΕΠΙΛΟΓΗ.
- Follow the on-screen prompts to add, review, or edit entries.
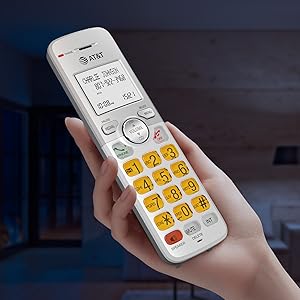
Image: A cordless handset on its base, with the screen showing a phonebook directory interface, indicating the ability to store up to 50 names and numbers.
4.5. Caller ID/Call Waiting
The handset displays the caller's name and number if you subscribe to Caller ID service. The phone stores up to 50 Caller ID records.
- ReviewΙστορικό αναγνώρισης καλούντος: Τύπος CID when the handset is idle. Scroll through the list using the DIR / ΤΟΜΟΣ κουμπιά.
- To Call Back: Ενώ viewεισάγοντας μια καταχώρηση αναγνώρισης καλούντος, πατήστε ΤΗΛΕΦΩΝΟ / FLASH.

Image: A close-up of the cordless handset's screen showing an incoming call with caller ID information, including name and number.
5. Χαρακτηριστικά
- Τεχνολογία DECT 6.0: Provides superior sound quality, security, and range. This digital technology ensures calls are clear and interference-free, with an operating range of up to 1000 feet outdoors.
- Simulated Full-Duplex Handset Speakerphone: Allows both parties to speak and be heard simultaneously, enhancing natural conversation flow.
- Λειτουργία ECO: An energy-saving feature that intelligently manages power consumption, extending battery life and reducing energy usage.
- Backlit Screen and Lighted Keypad: The high-contrast white backlit LCD screen and illuminated keypad ensure easy readability and dialing in various lighting conditions, including low light.
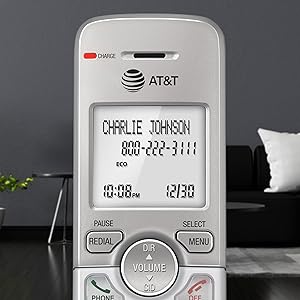
Image: A hand holding the cordless handset, clearly showing the illuminated keypad and the bright, backlit LCD screen in a dimly lit room.
- Extra-Large Display: The large text on the screen makes it easy to read caller ID information and navigate menus.
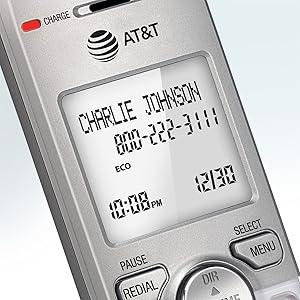
Εικόνα: Κοντινό πλάνο view of the cordless handset's screen, highlighting the large, easy-to-read text for caller ID and time display.
- Μεγάλα κουμπιά: Features large font and extra-large backlit keys, which are particularly helpful for users with visual impairments.

Image: A cordless handset on its base, showing the large, clearly visible, and backlit numeric keys. An inset image shows an elderly man comfortably using the phone.
- Wall-Mount Bracket Included: The base unit can be easily installed on a table or mounted on a wall for flexible placement options.
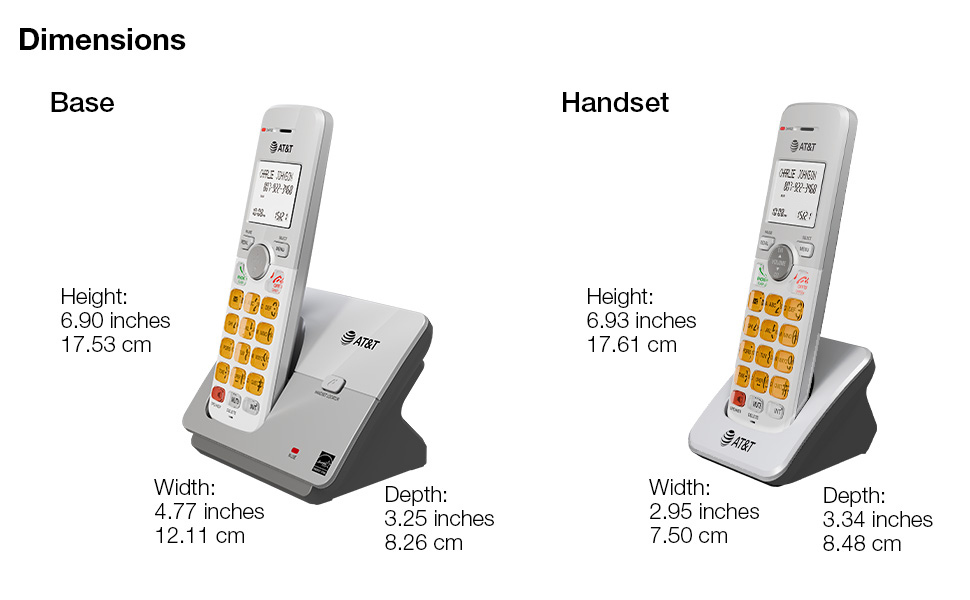
Image: The cordless phone base unit with a handset, shown mounted on a wall using the included bracket, demonstrating its versatile installation options.
6. Συντήρηση
- Καθάρισμα: Clean the phone and base unit with a soft, slightly damp πανί. Μην χρησιμοποιείτε σπρέι καθαρισμού ή σκληρά χημικά.
- Φροντίδα μπαταρίας: To maintain optimal battery life, fully charge the handsets for 16 hours before first use. If the phone will not be used for an extended period, remove the batteries.
- Περιβαλλοντικές Συνθήκες: Αποφύγετε την τοποθέτηση του τηλεφώνου σε άμεσο ηλιακό φως, κοντά σε πηγές θερμότητας ή σε περιοχές με υπερβολική υγρασία ή σκόνη.
7. Αντιμετώπιση Προβλημάτων
7.1. Δεν υπάρχει τόνος κλήσης
- Ensure the base unit's power adapter is securely plugged into an electrical outlet and the telephone line cord is connected to a working wall jack.
- Check if other phones on the same line are working. If not, contact your telephone service provider.
7.2. Handset Does Not Charge
- Verify the handset is correctly placed in the charging cradle and the CHARGE light is on.
- Ensure the battery pack is properly installed and connected inside the handset.
- Καθαρίστε τις επαφές φόρτισης τόσο στο ακουστικό όσο και στη βάση φόρτισης με ένα στεγνό πανί.
7.3. Poor Sound Quality or Interference
- Μετακινήστε το ακουστικό πιο κοντά στη μονάδα βάσης.
- Avoid placing the base unit near other electronic devices (e.g., microwaves, computers, Wi-Fi routers) that may cause interference.
- If using a DSL service, ensure a DSL filter is installed on the telephone line.
7.4. Display is Blank or Handset Does Not Power On
- Ensure the battery pack is fully charged. Place the handset in the charger for at least 16 hours.
- Check that the battery pack is correctly installed.
8. Προδιαγραφές
| Διαστάσεις προϊόντος | 4.76 x 3.29 x 6.81 ίντσες |
|---|---|
| Βάρος αντικειμένου | 2.59 λίρες |
| Αριθμός μοντέλου | EL51403 |
| Μπαταρίες | 4 Απαιτούνται μπαταρίες για συγκεκριμένο προϊόν (περιλαμβάνονται) |
| Τύπος τηλεφώνου | Ασύρματο |
| Υλικό | Πλαστική ύλη |
| Πηγή ισχύος | Ενσύρματο Ηλεκτρικό |
| Τύπος Dialer | Μονό Πληκτρολόγιο |
| Τύπος συστήματος απάντησης | Οχι |
| Συμβατές Συσκευές | PSTN Landline Services |

Image: A visual representation of the AT&T EL51403 base unit and a handset, detailing their respective height, width, and depth measurements.
9. Εγγύηση και υποστήριξη
AT&T products are manufactured by VTech Communications, Inc. A standard limited warranty typically covers defects in materials and workmanship under normal use for a specified period from the date of purchase. Please refer to the warranty card included in your product packaging or visit the official AT&T product support website for detailed warranty information and customer service contact options.
For technical support or warranty claims, please contact AT&T customer service. Keep your purchase receipt as proof of purchase.


