1. Εισαγωγή
Thank you for choosing the ADE CK2310 Digital Radio Alarm Clock. This device offers precise timekeeping via DCF radio signal, dual alarm settings, temperature and humidity display, and a convenient backlight function. Its compact design makes it suitable for both home use and travel. Please read this manual carefully to ensure proper use and optimal performance of your new alarm clock.

Image 1.1: The ADE CK2310 Digital Radio Alarm Clock is designed for portability, making it an ideal travel companion.
2. Πληροφορίες Ασφάλειας
- Κρατήστε τη συσκευή μακριά από νερό και υψηλή υγρασία.
- Μην εκθέτετε τη συσκευή σε ακραίες θερμοκρασίες ή άμεσο ηλιακό φως.
- Αποφύγετε να ρίξετε τη συσκευή ή να την εκθέσετε σε ισχυρές κρούσεις.
- Μην επιχειρήσετε να αποσυναρμολογήσετε ή να επισκευάσετε μόνοι σας τη συσκευή. Επικοινωνήστε με εξειδικευμένο προσωπικό σέρβις.
- Απορρίψτε τις χρησιμοποιημένες μπαταρίες σύμφωνα με τους τοπικούς κανονισμούς.
- Κρατήστε τις μπαταρίες μακριά από παιδιά.
3. Περιεχόμενα συσκευασίας
Παρακαλούμε ελέγξτε τα περιεχόμενα της συσκευασίας κατά την αποσυσκευασία:
- ADE CK2310 Digital Radio Alarm Clock
- 2 x AAA μπαταρίες
- Εγχειρίδιο οδηγιών

Image 3.1: The package includes the ADE CK2310 alarm clock and two AAA batteries.
4. Το προϊόν τελείωσεview
Familiarize yourself with the various components and display elements of your alarm clock.
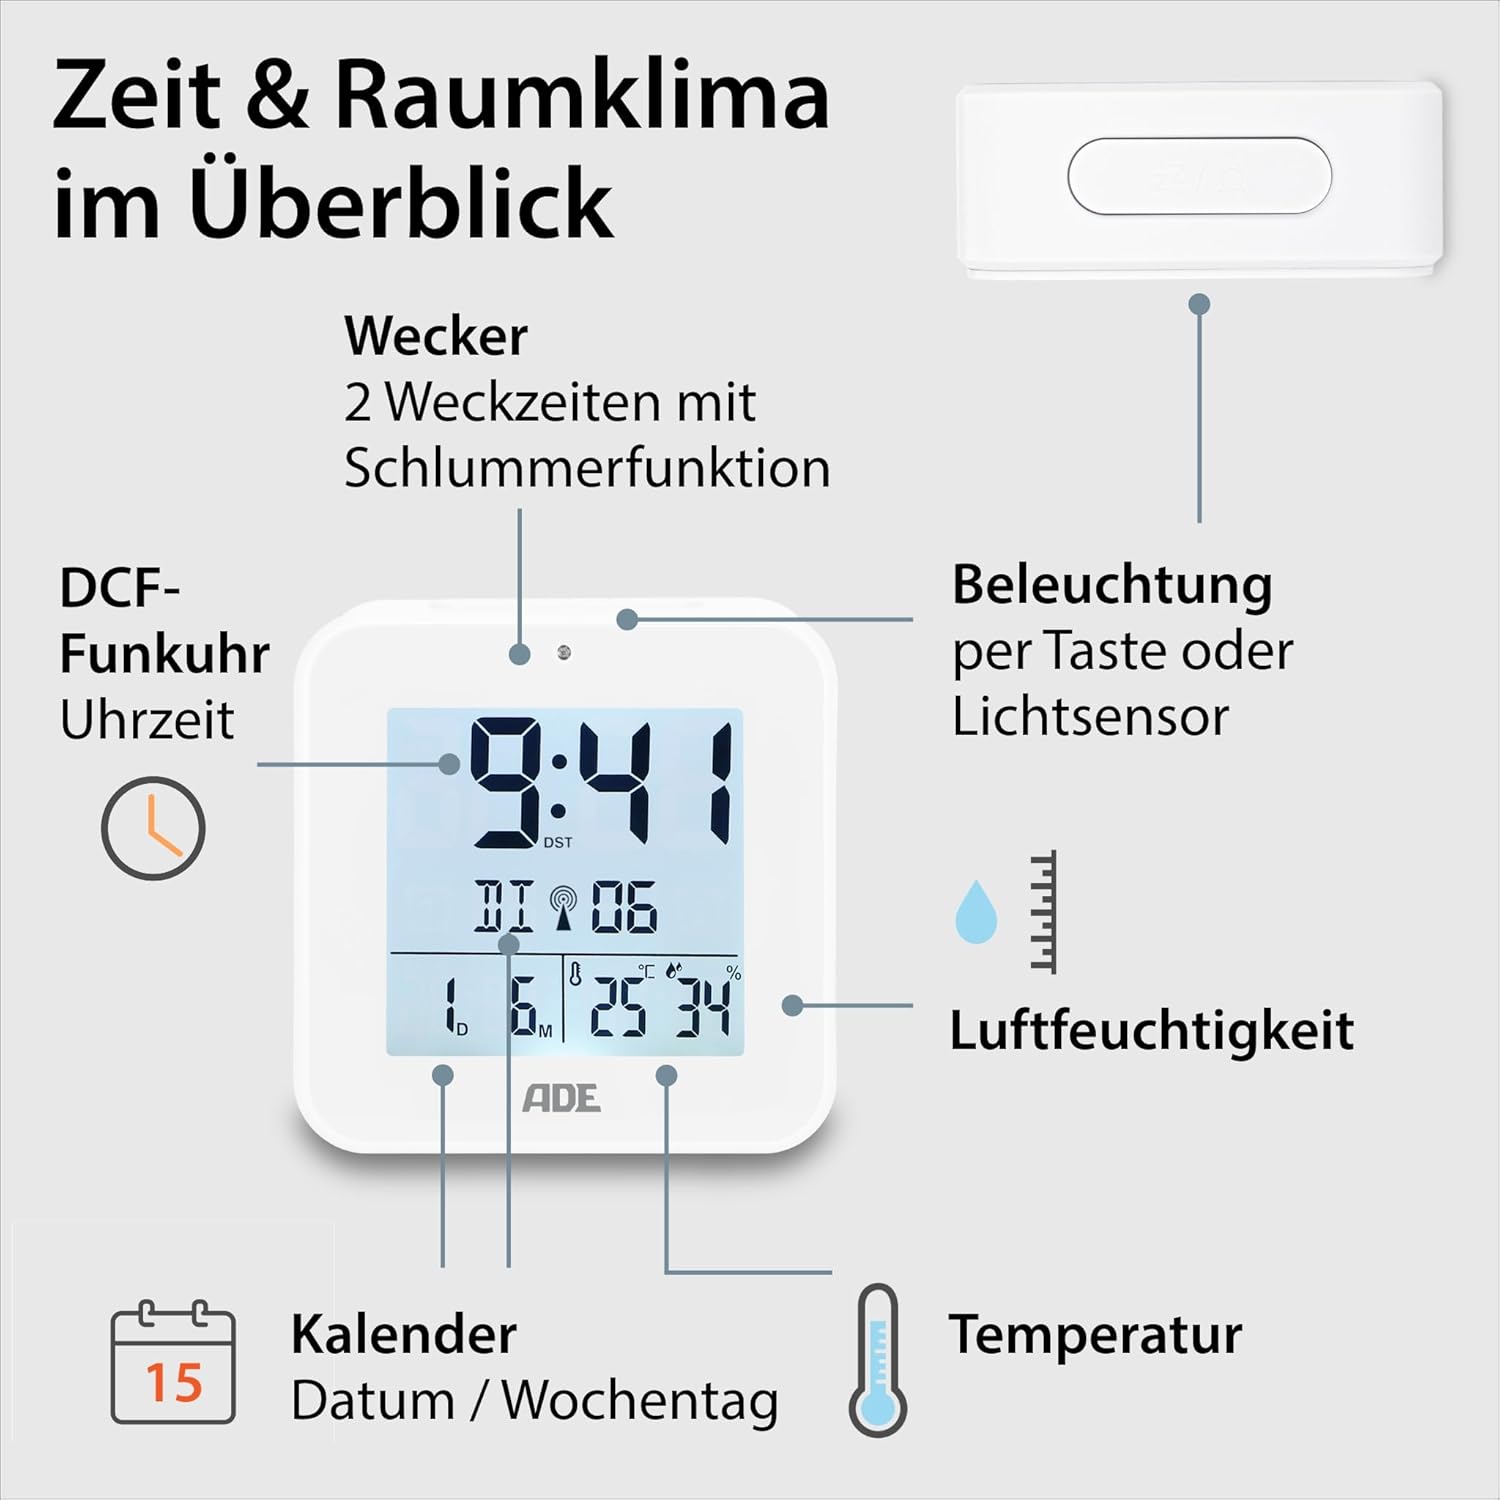
Image 4.1: Front display and key features of the ADE CK2310.
- Εμφάνιση ώρας: Shows current time (hours, minutes).
- Δείκτης σήματος DCF: Indicates successful reception of the radio time signal.
- Ενδείξεις συναγερμού: Shows if Alarm 1 or Alarm 2 is active.
- Date and Day of Week: Displays the current date and day.
- Οθόνη θερμοκρασίας: Shows ambient temperature in Celsius or Fahrenheit.
- Ένδειξη υγρασίας: Shows ambient relative humidity.
- Κουμπί αναβολής/φωτισμού: Activates snooze during an alarm or backlight manually.
- Κουμπιά λειτουργιών: Buttons for setting time, alarms, and other functions (located on the back/side).
- Αισθητήρας φωτός: Automatically activates backlight in dark environments.

Εικόνα 4.2: Πίσω view with controls and battery compartment.
The compact dimensions of the alarm clock are approximately 7.2 x 3.8 x 7.2 cm (width x depth x height).

Image 4.3: Dimensions of the ADE CK2310 alarm clock.
5. Ρύθμιση
5.1. Τοποθέτηση μπαταρίας
- Open the battery compartment cover on the back of the alarm clock (refer to Image 4.2).
- Τοποθετήστε τις δύο μπαταρίες AAA, φροντίζοντας για τη σωστή πολικότητα (+ και -).
- Κλείστε καλά το κάλυμμα της θήκης μπαταριών.
The alarm clock will power on automatically and begin searching for the DCF radio signal.
5.2. DCF Radio Signal Reception
Upon initial power-on or after battery replacement, the alarm clock will automatically attempt to receive the DCF radio time signal. This process can take several minutes. During reception, a signal icon may flash on the display. Once the signal is successfully received, the time will be set automatically, and the signal icon will appear steadily. For best reception, place the alarm clock near a window and away from electronic devices that may cause interference.
The DCF signal also ensures automatic adjustment for daylight saving time (summer/winter time).
5.3. Manual Time Setting (Optional)
If the DCF signal is not available or you prefer to set the time manually:
- Press and hold the "SET" button (or equivalent, refer to specific button labels on your device) for a few seconds until the time display starts flashing.
- Use the "+" or "-" buttons to adjust the hours.
- Press "SET" again to confirm the hours and move to minutes.
- Χρησιμοποιήστε τα κουμπιά "+" ή "-" για να ρυθμίσετε τα λεπτά.
- Press "SET" to confirm and exit manual setting mode.
- Repeat similar steps to set the date and year if necessary.
6. Οδηγίες λειτουργίας
6.1. Ρύθμιση συναγερμών (Συναγερμός 1 και Συναγερμός 2)
The ADE CK2310 features two independent alarm times. This is useful for different wake-up times on weekdays and weekends.

Image 6.1: The alarm clock supports two independent alarm times.
- Press the "ALARM 1" or "ALARM 2" button (usually located on the side or back) once to display the current alarm time.
- Press and hold the respective "ALARM" button until the alarm time starts flashing.
- Use the "+" or "-" buttons to adjust the alarm hours.
- Press the "ALARM" button again to confirm hours and move to minutes.
- Use the "+" or "-" buttons to adjust the alarm minutes.
- Press the "ALARM" button to confirm and exit alarm setting mode.
- To activate or deactivate an alarm, use the dedicated ON/OFF switch for Alarm 1 and Alarm 2 (refer to Image 6.1 for typical switch location). An alarm icon will appear on the display when active.
6.2. Λειτουργία αναβολής
When an alarm sounds, press the large "SNOOZE/LIGHT" button on top of the alarm clock. The alarm will pause for approximately 5 minutes and then sound again. To turn off the alarm completely, press any other button or let it ring for its full duration.
6.3. Ένδειξη θερμοκρασίας και υγρασίας
The alarm clock continuously displays the indoor temperature and relative humidity. You can switch between Celsius (°C) and Fahrenheit (°F) for temperature display by pressing a dedicated button (often labeled "°C/°F" or integrated with another setting button).
6.4. Λειτουργία οπίσθιου φωτισμού
The backlight can be activated in two ways:
- Μη αυτόματη ενεργοποίηση: Press the "SNOOZE/LIGHT" button on top. The backlight will illuminate for approximately 8 seconds.
- Automatic Activation (Light Sensor): Slide the "AUTO LIGHT" switch on the back of the device to the "ON" position (refer to Image 4.2). The built-in light sensor will detect low ambient light conditions and automatically activate a soft backlight, making the display visible in the dark. Slide the switch to "OFF" to disable this feature.
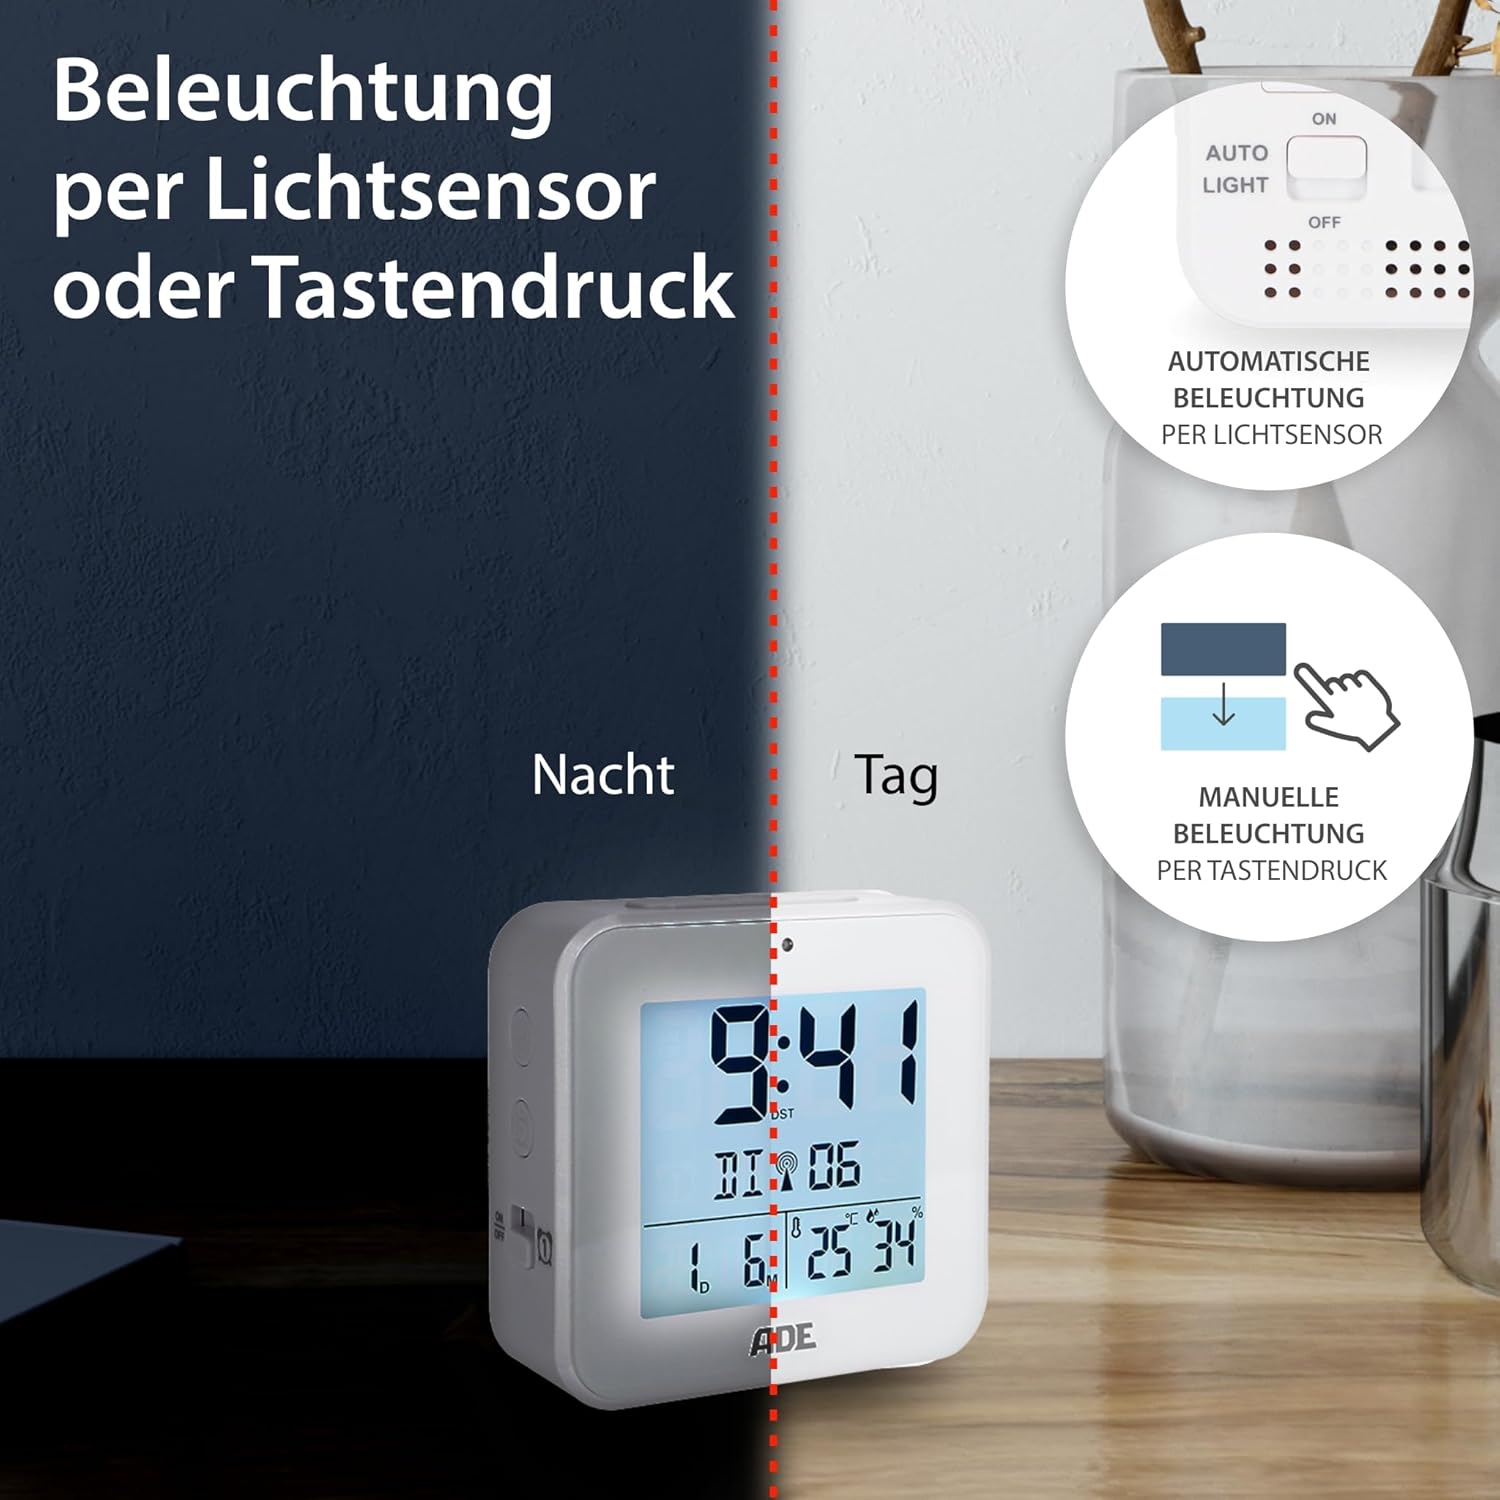
Image 6.2: Backlight can be activated manually or automatically via the light sensor.
7. Συντήρηση
- Καθάρισμα: Σκουπίστε τη συσκευή με ένα μαλακό, στεγνό πανί. Μην χρησιμοποιείτε λειαντικά καθαριστικά ή διαλύτες.
- Αντικατάσταση μπαταρίας: When the display becomes dim or functions are erratic, replace both AAA batteries. Ensure correct polarity. If the device will not be used for an extended period, remove the batteries to prevent leakage.
8. Αντιμετώπιση Προβλημάτων
| Πρόβλημα | Πιθανή αιτία | Διάλυμα |
|---|---|---|
| Η οθόνη είναι κενή ή αμυδρή. | Οι μπαταρίες είναι χαμηλές ή έχουν τοποθετηθεί λανθασμένα. | Αντικαταστήστε τις μπαταρίες με νέες, διασφαλίζοντας τη σωστή πολικότητα. |
| Η ώρα είναι λανθασμένη ή δεν ρυθμίζεται αυτόματα. | Κακή λήψη σήματος DCF ή παρεμβολές. | Move the alarm clock to a location with better reception (e.g., near a window, away from electronics). Allow time for signal acquisition. Manually set the time if necessary. |
| Δεν ηχεί ο συναγερμός. | Ο συναγερμός δεν έχει ενεργοποιηθεί ή έχει ρυθμιστεί λανθασμένα. | Ensure the alarm is switched "ON" and the alarm time is set correctly. Check for the alarm icon on the display. |
| Ο οπίσθιος φωτισμός δεν λειτουργεί. | AUTO LIGHT switch is OFF, or batteries are low. | Check if the "AUTO LIGHT" switch is in the "ON" position. Press the SNOOZE/LIGHT button manually. Replace batteries if needed. |
9. Προδιαγραφές
- Μοντέλο: CK2310
- Διαστάσεις: 8 x 3.81 x 8 cm (approx. W x D x H)
- Βάρος: 100 γρ
- Πηγή ενέργειας: 2 x μπαταρίες AAA (περιλαμβάνονται)
- Τύπος εμφάνισης: Ψηφιακό
- Υλικό: Πλαστικό ABS
- Ειδικά χαρακτηριστικά: DCF Radio Signal, 2 Alarm Times, Snooze Function, Temperature Display (°C/°F), Humidity Display, Calendar Display, Automatic Backlight (Light Sensor), Manual Backlight.
- Εσωτερική/Εξωτερική χρήση: Εσωτερικός
10. Εγγύηση & Υποστήριξη
ADE products are manufactured with quality and reliability in mind. For information regarding warranty terms and conditions, please refer to the warranty card included with your purchase or visit the official ADE website. For technical support or service inquiries, please contact your retailer or the ADE customer service department.
Κατασκευαστής: ΑΔΕ


