Εισαγωγή
This manual provides detailed instructions for the assembly, operation, and maintenance of your Vetroo AL800 Mid Tower ATX PC Computer Case. Please read this manual thoroughly before beginning installation to ensure proper setup and optimal performance.

Figure 1: Vetroo AL800 Mid Tower ATX PC Computer Case (Black)
Πληροφορίες Ασφάλειας
- Αποσυνδέετε πάντα την παροχή ρεύματος από την πρίζα πριν από την εγκατάσταση ή την αφαίρεση οποιωνδήποτε εξαρτημάτων.
- Handle components with care to avoid damage from electrostatic discharge. Consider using an anti-static wrist strap.
- Keep the case and components away from liquids and excessive humidity.
- Εξασφαλίστε τον κατάλληλο αερισμό για να αποφύγετε την υπερθέρμανση.
- Μην επιχειρήσετε να τροποποιήσετε τη θήκη ή τα εξαρτήματά της, καθώς αυτό μπορεί να ακυρώσει την εγγύησή σας και να θέσει σε κίνδυνο την ασφάλεια.
Περιεχόμενα συσκευασίας
Βεβαιωθείτε ότι όλα τα στοιχεία υπάρχουν στη συσκευασία:
- Vetroo AL800 Mid Tower ATX PC Computer Case
- Κουτί αξεσουάρ (βίδες, στηρίγματα, δεματικά καλωδίων)
- Pre-installed 1x 120mm PWM/ARGB Fan (rear)
- Εγχειρίδιο χρήστη (αυτό το έγγραφο)
Βασικά Χαρακτηριστικά
- ARGB LED Strip: Integrated LED lighting and ARGB case fans can be synchronized with compatible motherboards via a 5V 3-pin interface.
- Door Opening Design: Features a 4mm thick tempered glass side panel with a convenient door-opening mechanism for easy access to internal components.
- High Performance Airflow: A mesh front panel and strategically placed dust filters ensure optimal airflow and system cooling.
- Ευρεία συμβατότητα: Supports ATX, M-ATX, and ITX motherboards. Accommodates GPUs up to 340mm in length and CPU coolers up to 165mm in height.
- Υποστήριξη Υγρής Ψύξης: Front panel supports up to a 360mm liquid cooling radiator.
- Υποστήριξη θαυμαστών: Υποστηρίζει έως και 8 ανεμιστήρες 120 mm.
- Απλή διαχείριση καλωδίων: Includes two soft silicone cord grommets for organized cable routing.
- Powerful I/O Panel: Features 1x USB 3.2 Type-C port, 2x USB 3.0 ports, and a combined microphone/headphone jack.
Ρύθμιση και εγκατάσταση
1. Γενική Προετοιμασία
- Τοποθετήστε τη θήκη σε μια επίπεδη, σταθερή επιφάνεια.
- Open the tempered glass side panel by gently pulling it open. It is hinged for easy access.
- Remove the tempered glass panel if necessary for easier installation by lifting it off its hinges once open.

Figure 2: Tempered Glass Door Opening Design
2. Εγκατάσταση μητρικής πλακέτας
- Εγκαταστήστε την θωράκιση I/O (εάν υπάρχει) στο πίσω άνοιγμα του περιβλήματος.
- Align your ATX, M-ATX, or ITX motherboard with the pre-installed standoffs.
- Ασφαλίστε τη μητρική πλακέτα χρησιμοποιώντας τις παρεχόμενες βίδες από το κουτί αξεσουάρ.
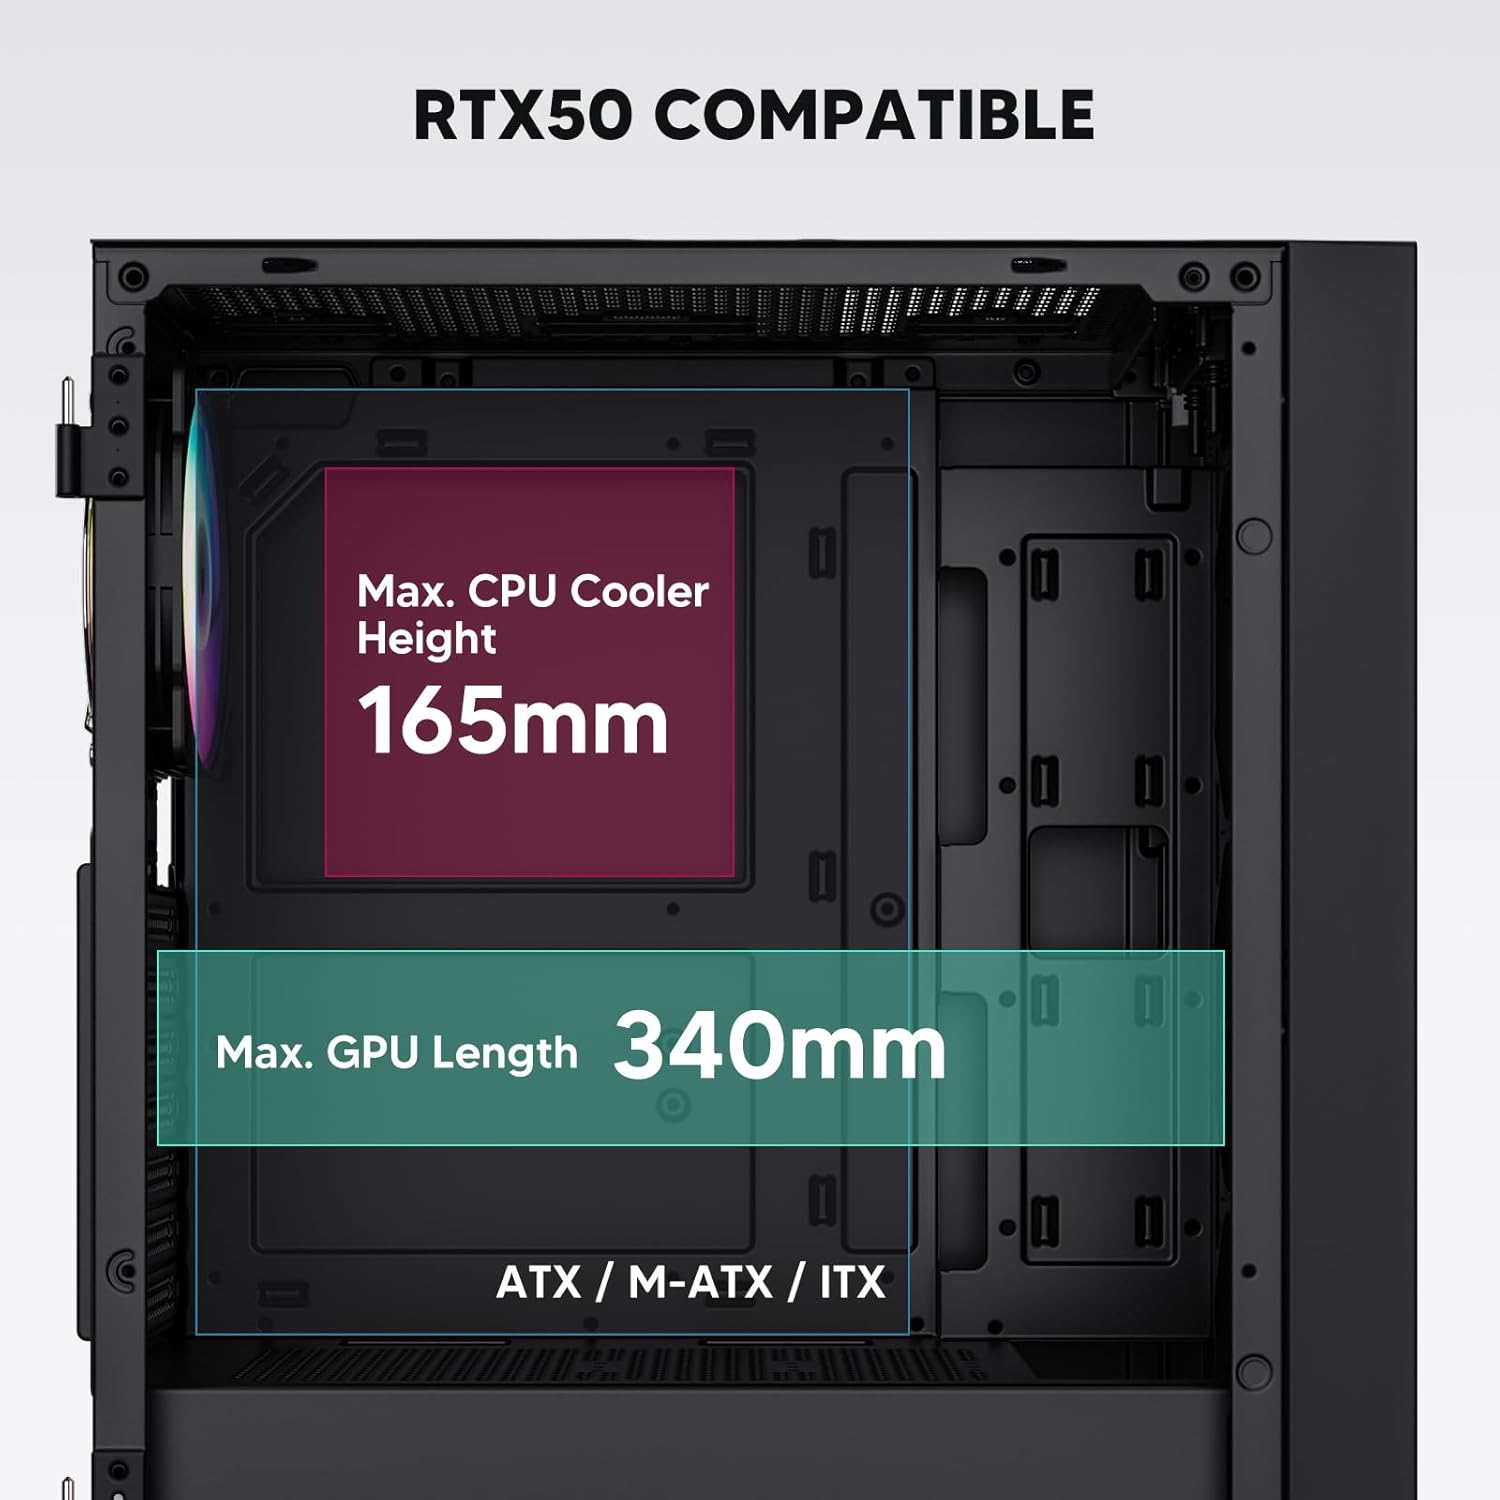
Figure 3: Motherboard and Component Clearance (Max CPU Cooler Height 165mm, Max GPU Length 340mm)
3. Storage Device Installation (HDD/SSD)
- Locate the dedicated mounting points for SSDs and HDDs.
- Install 2.5" SSDs onto the SSD trays or mounting brackets.
- Install 3.5" HDDs into the drive cage located at the bottom of the case.
- Στερεώστε όλες τις μονάδες δίσκου με τις κατάλληλες βίδες.

Figure 4: Internal Layout with Drive Bay Locations (SSD, HDD, Power Supply)
4. Εγκατάσταση τροφοδοτικού
- Mount your power supply unit (PSU) in the dedicated compartment at the bottom rear of the case.
- Ensure the PSU fan faces downwards (if the case has a bottom vent) or upwards, depending on your cooling preference.
- Secure the PSU with screws from the rear of the case. The case supports PSUs up to 200mm in length.
5. Εγκατάσταση κάρτας επέκτασης (GPU)
- Αφαιρέστε τα απαραίτητα καλύμματα υποδοχών PCI-E από το πίσω μέρος της θήκης.
- Insert your graphics card or other expansion cards into the motherboard's PCI-E slots.
- Secure the cards with screws. The case supports GPUs up to 340mm in length.
6. Cooling System Installation (Fans/Radiators)
- The case comes with one pre-installed 120mm PWM/ARGB fan at the rear.
- Additional fans (120mm or 140mm) can be installed at the front, top, and bottom.
- Liquid cooling radiators up to 360mm can be installed at the front, and up to 240mm at the top.
- Refer to the diagram for supported fan and radiator configurations.

Figure 5: Fan and Liquid Radiator Support Diagram
7. Συνδέσεις μπροστινού πίνακα
- Connect the front panel cables (Power, Reset, USB 3.0, USB Type-C, HD Audio) to the corresponding headers on your motherboard.
- Consult your motherboard manual for the exact pin layout of these headers.
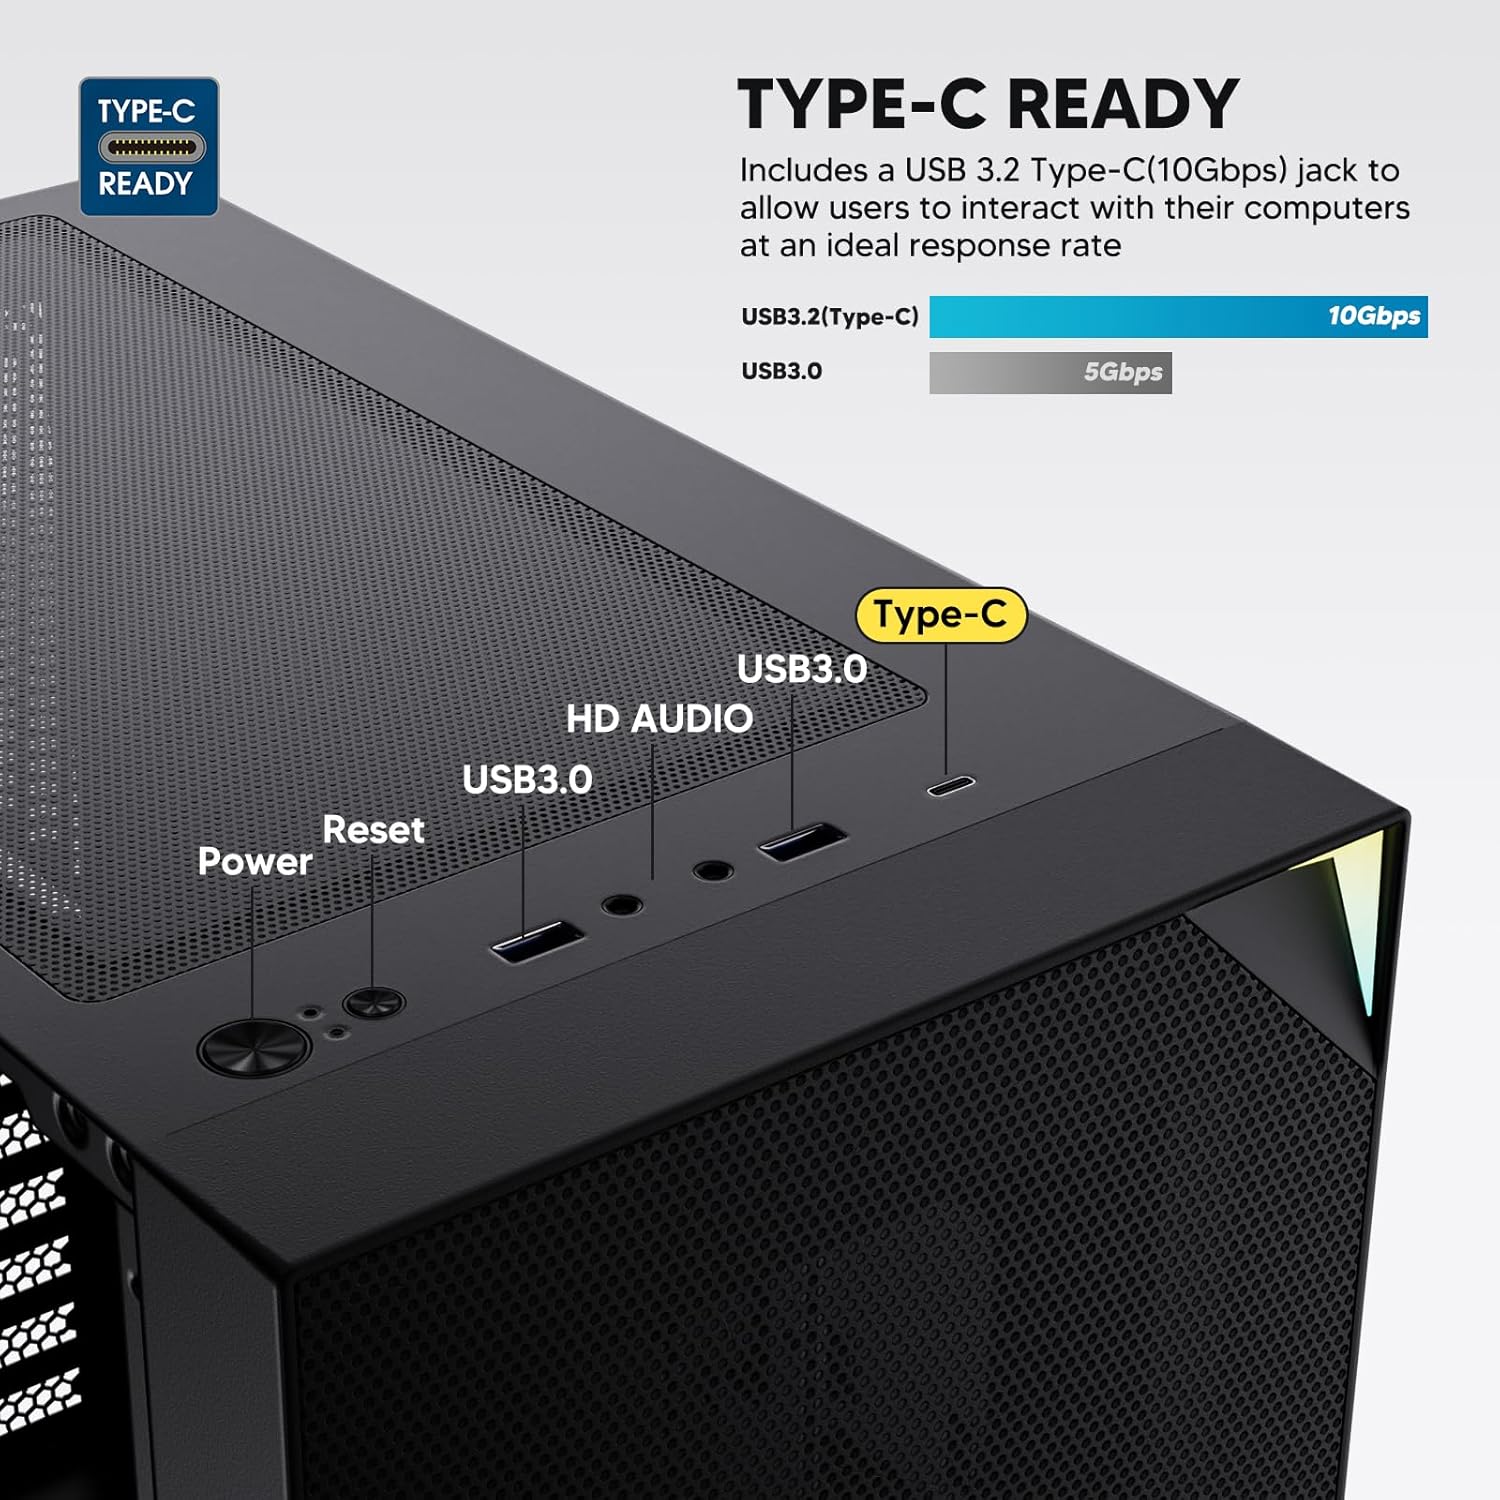
Figure 6: Top I/O Panel Connections
8. ARGB and PWM Connections
- The pre-installed fan and ARGB LED strip require connection to your motherboard.
- Connect the 4-pin PWM connector from the fan to a compatible fan header on your motherboard for speed control.
- Connect the 3-pin ARGB connector from the fan and LED strip to a 5V 3-pin ARGB header on your motherboard for lighting synchronization. Μην το συνδέετε σε κεφαλίδα RGB 12V, καθώς αυτό θα προκαλέσει ζημιά στις λυχνίες LED.
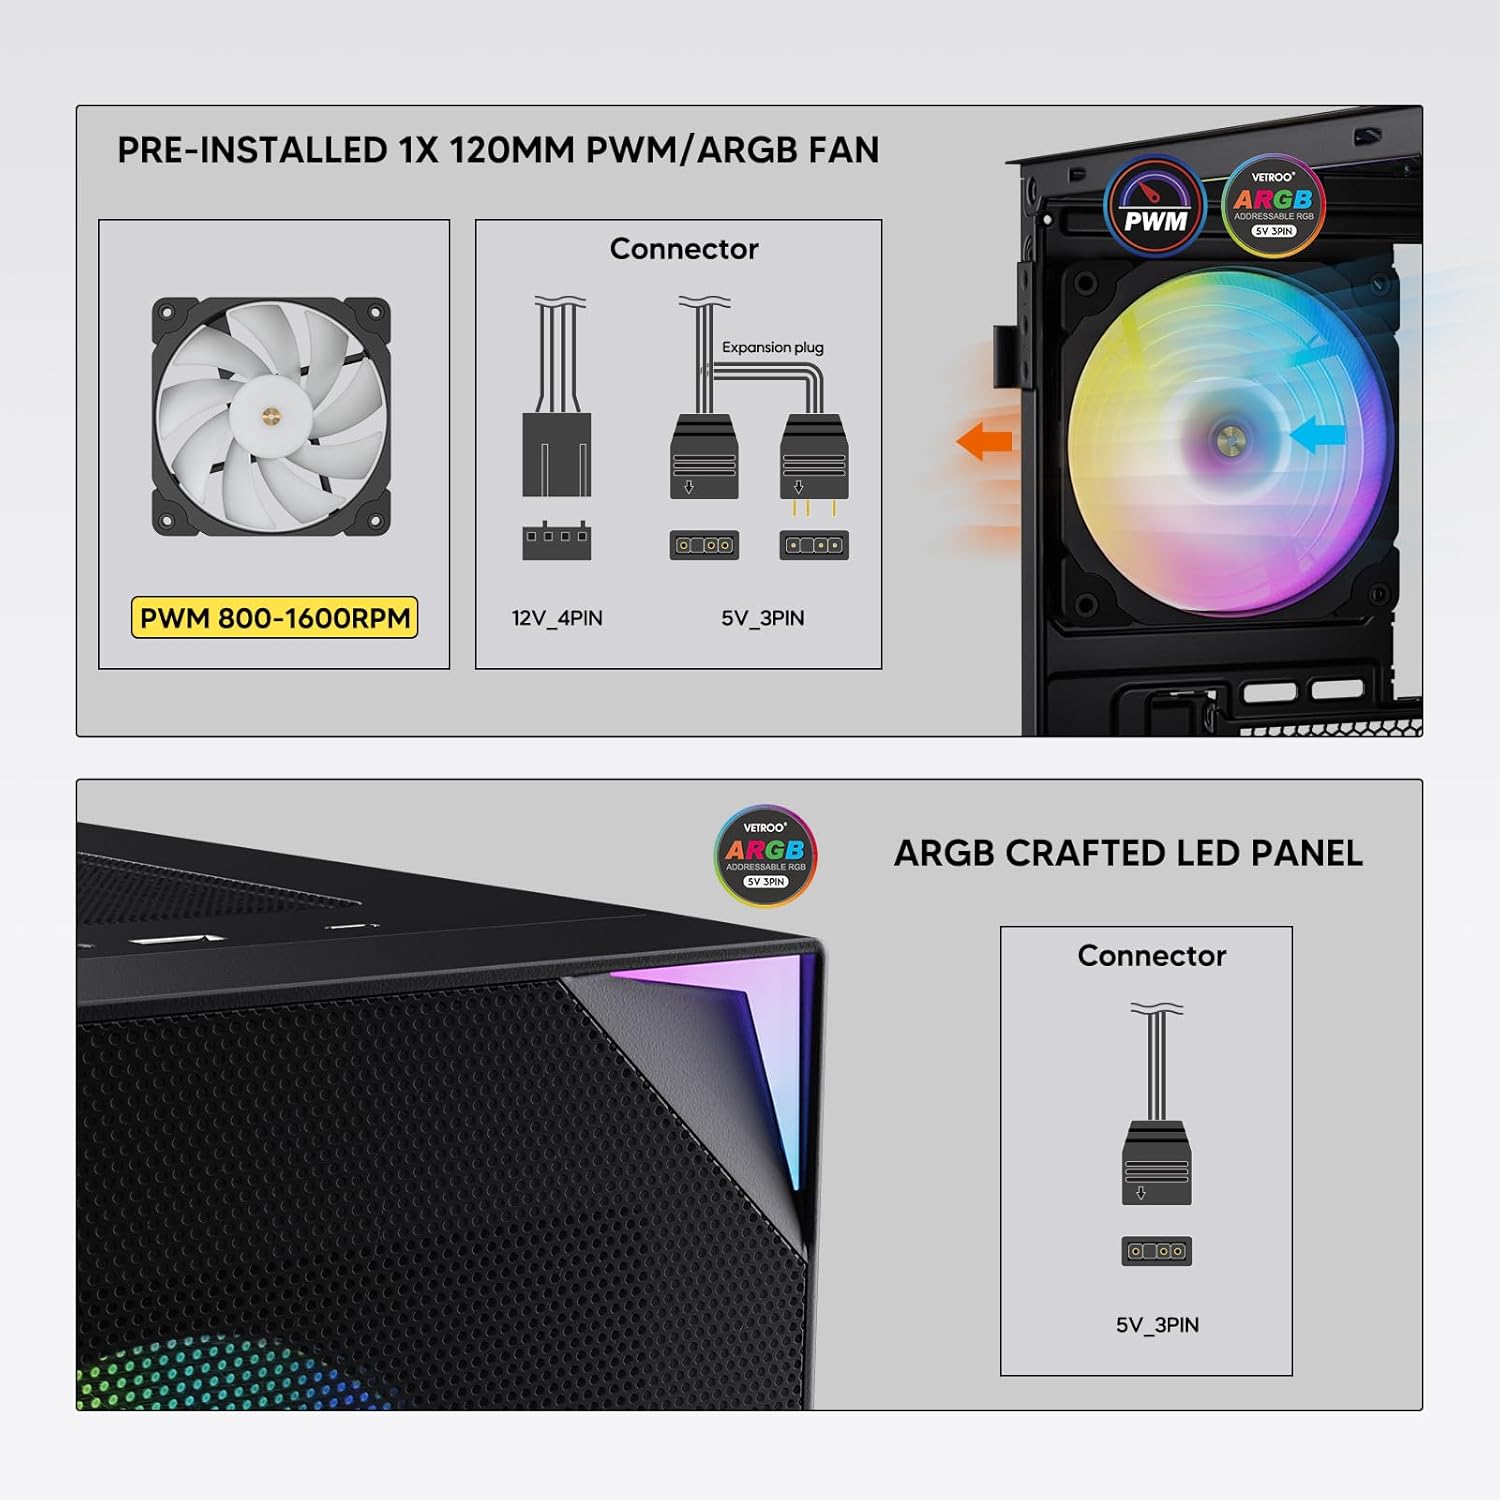
Figure 7: PWM and ARGB Connector Details
9. Διαχείριση καλωδίων
- Utilize the cable routing cutouts and tie-down points behind the motherboard tray to organize cables.
- The soft silicone grommets help protect cables and provide a clean look.
- Proper cable management improves airflow and aesthetics.
Λειτουργία
1. Αρχική ενεργοποίηση
- After all components are securely installed and cables connected, close the tempered glass side panel.
- Συνδέστε την οθόνη, το πληκτρολόγιο, το ποντίκι και το καλώδιο τροφοδοσίας στον υπολογιστή.
- Γυρίστε τον διακόπτη λειτουργίας στο τροφοδοτικό σας στη θέση «ON».
- Press the power button on the top I/O panel of the case to start your system.
2. Έλεγχος φωτισμού ARGB
- If connected to a compatible motherboard's 5V 3-pin ARGB header, the lighting of the pre-installed fan and LED strip can be controlled via your motherboard's RGB software (e.g., ASUS Aura Sync, MSI Mystic Light Sync, Gigabyte RGB Fusion, ASRock Polychrome Sync).
- Refer to your motherboard's manual for specific instructions on using its ARGB control software.
3. Διαχείριση ροής αέρα
- The mesh front panel is designed for optimal air intake.
- Ensure that intake fans (typically front and bottom) and exhaust fans (typically rear and top) are configured to create positive or neutral air pressure for efficient cooling and dust prevention.

Figure 8: Airflow Diagram with Dust Filters
Συντήρηση
1. Καθαρισμός φίλτρου σκόνης
- The case is equipped with dust filters on the top and bottom panels.
- Regularly check and clean these filters to maintain optimal airflow and prevent dust buildup inside the system.
- Gently remove the magnetic dust filters and clean them with compressed air or by rinsing with water (ensure they are completely dry before re-installation).
2. Tempered Glass Panel Care
- Clean the tempered glass panel with a soft, lint-free cloth and a non-abrasive glass cleaner.
- Avoid harsh chemicals or abrasive materials that could scratch or damage the glass.
Αντιμετώπιση προβλημάτων
- Το σύστημα δεν ενεργοποιείται:
- Βεβαιωθείτε ότι το καλώδιο τροφοδοσίας είναι καλά συνδεδεμένο τόσο στην τροφοδοτική μονάδα όσο και στην πρίζα.
- Βεβαιωθείτε ότι ο διακόπτης του τροφοδοτικού βρίσκεται στη θέση «ON».
- Ελέγξτε ότι το καλώδιο του κουμπιού τροφοδοσίας του μπροστινού πίνακα είναι σωστά συνδεδεμένο στην κεφαλίδα της μητρικής πλακέτας.
- Confirm all power cables (24-pin ATX, CPU, GPU) are properly seated in the motherboard and components.
- Οι ανεμιστήρες δεν περιστρέφονται / Το ARGB δεν ανάβει:
- Check that the fan's PWM connector is securely plugged into a motherboard fan header.
- Verify the ARGB 3-pin connector is correctly attached to a 5V 3-pin ARGB header on the motherboard (not 12V RGB).
- Βεβαιωθείτε ότι το λογισμικό ARGB της μητρικής πλακέτας σας έχει εγκατασταθεί και ρυθμιστεί σωστά.
- Οι θύρες USB δεν λειτουργούν:
- Confirm the USB 3.0 and USB Type-C front panel cables are correctly connected to their respective motherboard headers.
- Check your motherboard manual for correct header locations.
- For other component-specific issues, refer to the instruction manuals for your motherboard, CPU, GPU, and other installed hardware.
Προδιαγραφές
| Μάρκα | Vetroo |
| Όνομα μοντέλου | AL800 |
| Αριθμός μοντέλου είδους | VT-CASE-AL800-BK (FBA) |
| Τύπος υπόθεσης | Mid Tower |
| Συμβατότητα μητρικής πλακέτας | ATX, M-ATX, ITX |
| Χρώμα | Μαύρος |
| Υλικό | Μέταλλο, σκληρυμένο γυαλί |
| Βάρος αντικειμένου | 12.37 λίβρες (περίπου 5.61 κιλά) |
| Διαστάσεις προϊόντος (ΜxΠxΥ) | 18.4 x 8.6 x 17.9 ίντσες (περίπου 46.7 x 21.8 x 45.5 εκ.) |
| Μέγιστο μήκος GPU | 340 χλστ |
| Μέγιστο ύψος ψύξης CPU | 165 χλστ |
| Μέγιστο μήκος PSU | 200 χλστ |
| Μπροστινές θύρες I/O | 1x USB 3.2 Type-C, 2x USB 3.0, HD Audio (Mic/Headphone), Power, Reset |
| Υποστήριξη θαυμαστών | Front: 3x 120mm or 2x 140mm; Top: 2x 120mm or 2x 140mm; Rear: 1x 120mm; Bottom: 2x 120mm |
| Υποστήριξη καλοριφέρ | Front: 120/140/240/280/360mm; Top: 120/140/240mm; Rear: 120mm |
| Προεγκατεστημένοι ανεμιστήρες | 1x 120mm PWM/ARGB (Rear) |
Εγγύηση και υποστήριξη
For warranty information, technical support, or to inquire about replacement parts, please visit the official Vetroo webστον ιστότοπο ή επικοινωνήστε απευθείας με την εξυπηρέτηση πελατών. Κρατήστε την απόδειξη αγοράς για τυχόν αξιώσεις εγγύησης.
Official Vetroo Store: Vetroo Amazon Store
Σχετικά Έγγραφα - AL800
 |
Εγχειρίδιο χρήστη για το κουτί υπολογιστή Vetroo AL800 Εγχειρίδιο χρήστη για το κουτί υπολογιστή Vetroo AL800, με λεπτομερή βήματα εγκατάστασης για εξαρτήματα όπως η μητρική πλακέτα, το τροφοδοτικό, οι ανεμιστήρες, τα υγρά θερμαντικά σώματα, οι σκληροί δίσκοι, οι μονάδες SSD και οι κάρτες γραφικών. Περιλαμβάνει οδηγό σύνδεσης πάνελ εισόδου/εξόδου και λίστα αξεσουάρ. |
 |
Εγχειρίδιο οδηγιών για θήκη παιχνιδιών Vetroo AL800 Full Tower Πλήρες εγχειρίδιο οδηγιών για το κουτί gaming υπολογιστή Vetroo AL800 Full Tower. Μάθετε πώς να εγκαταστήσετε το τροφοδοτικό, τη μητρική πλακέτα, τις μονάδες αποθήκευσης (SSD/HDD), την κάρτα γραφικών και κατανοήστε τις επιλογές υποστήριξης ανεμιστήρων και ψυγείων. Περιλαμβάνει λίστα αξεσουάρ και λεπτομερείς οδηγίες βήμα προς βήμα. |
 |
Εγχειρίδιο χρήστη για το κουτί υπολογιστή Vetroo MESH-7C AL SERIES Λεπτομερές εγχειρίδιο χρήστη για το κουτί υπολογιστή Vetroo MESH-7C AL SERIES, το οποίο καλύπτει τις προδιαγραφές, τις διαστάσεις, τα αξεσουάρ και τα βήματα εγκατάστασης υλικού για την κατασκευή του υπολογιστή σας. |
 |
Εγχειρίδιο οδηγιών για το κουτί υπολογιστή Vetroo M05 M-ATX Λεπτομερές εγχειρίδιο οδηγιών για τη συναρμολόγηση του κουτιού υπολογιστή Vetroo M05 M-ATX, που καλύπτει την εγκατάσταση εξαρτημάτων, τη χρήση αξεσουάρ και τις συνδέσεις του πίνακα I/O. |
 |
Εγχειρίδιο χρήστη για το κουτί υπολογιστή Vetroo AL900 ATX Εγχειρίδιο χρήστη για τη θήκη Vetroo AL900 ATX για PC Gaming, με λεπτομέρειες για τη συναρμολόγηση, την εγκατάσταση εξαρτημάτων όπως το τροφοδοτικό και τις συνδέσεις του πίνακα I/O. |
 |
Εγχειρίδιο χρήστη και οδηγός εγκατάστασης ψύκτη CPU Vetroo U6 Λεπτομερές εγχειρίδιο χρήστη και οδηγός εγκατάστασης για την ψύκτρα CPU Vetroo U6, που καλύπτει τη συμβατότητα με τις υποδοχές Intel LGA 1700/1200/115X και AMD AM5/AM4/AM3(+)/AM2(+)/FM2(+)/FM1. Περιλαμβάνει λίστα εξαρτημάτων και οδηγίες συναρμολόγησης βήμα προς βήμα. |