1. Εισαγωγή
This manual provides comprehensive instructions for the setup, operation, and maintenance of your Xprinter XP-Q801K Thermal Receipt Printer. This printer is designed for efficient and reliable receipt printing in various business environments, featuring high-speed direct thermal printing and a USB interface for easy connectivity.

Εικόνα 1: Εμπρός view of the Xprinter XP-Q801K Thermal Receipt Printer, showing the paper output slot and control buttons.
2. Ρύθμιση
2.1 Αποσυσκευασία
Αφαιρέστε προσεκτικά τον εκτυπωτή και όλα τα αξεσουάρ από τη συσκευασία. Βεβαιωθείτε ότι υπάρχουν όλα τα εξαρτήματα:
- Θερμικός εκτυπωτής αποδείξεων Xprinter XP-Q801K
- Μετασχηματιστής ρεύματος
- Καλώδιο USB
- Ρολό χαρτιού (αρχικό)
- Εγχειρίδιο χρήστη (αυτό το έγγραφο)
2.2 Σύνδεση του εκτυπωτή
Before connecting, ensure the printer is powered off. Locate the ports on the rear of the printer.
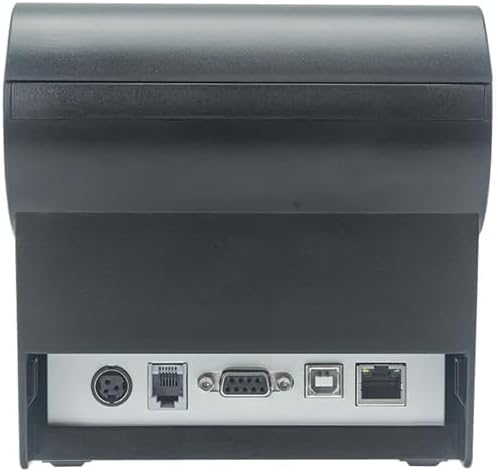
Εικόνα 2: Πίσω view of the printer, highlighting the power, USB, and other interface ports.
- Σύνδεση τροφοδοσίας: Insert the power adapter cable into the printer's power input port (DC 24V/2.5A) and plug the adapter into a suitable electrical outlet (AC 100-240V, 50-60Hz).
- Σύνδεση USB: Connect one end of the provided USB cable to the USB port on the printer and the other end to an available USB port on your computer.
- Cash Drawer (Optional): If using a cash drawer, connect its cable to the cash drawer port (DC 24V/1A) on the printer.
2.3 Τοποθέτηση του ρολού χαρτιού
The printer uses 80mm wide thermal paper rolls.
- Ανοίξτε το χάρτινο κάλυμμα πατώντας το κουμπί ανοίγματος καλύμματος (συνήθως βρίσκεται στο πλάι ή στο μπροστινό μέρος).
- Insert the thermal paper roll with the printing surface facing the print head. Ensure the roll is seated correctly in the paper compartment.
- Τραβήξτε μια μικρή ποσότητα χαρτιού έξω από τον κόφτη.
- Κλείστε καλά το κάλυμμα χαρτιού μέχρι να ασφαλίσει στη θέση του.
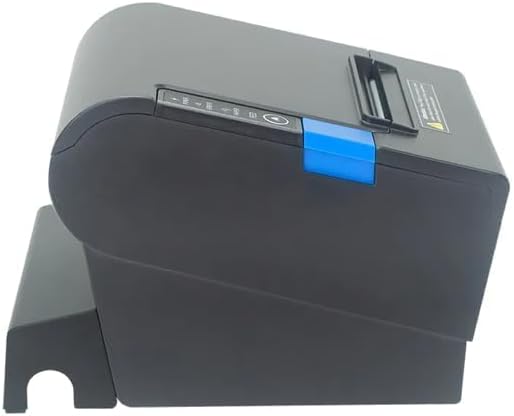
Εικόνα 3: Πλευρά view of the printer, illustrating the paper cover mechanism.
2.4 Εγκατάσταση προγράμματος οδήγησης
The printer requires a driver to communicate with your computer. Drivers are typically available for Windows, Linux, Android, and Mac operating systems.
- For Windows users, the printer often supports plug-and-play installation or requires a specific Windows driver.
- For Linux, Android, and Mac, SDKs (Software Development Kits) are usually provided for integration.
Ανατρέξτε στις οδηγίες του κατασκευαστή website or the included driver CD/USB drive for the latest drivers and installation instructions specific to your operating system.
3. Λειτουργία του εκτυπωτή
3.1 Ενεργοποίηση/Απενεργοποίηση
Locate the power switch on the side or rear of the printer. Flip the switch to the 'ON' position to power on the printer. The 'POWER' indicator light will illuminate. Flip to 'OFF' to power down.
3.2 Indicator Lights and Buttons
The front panel typically features several indicator lights and buttons:
- ΕΞΟΥΣΙΑ: Υποδεικνύει ότι ο εκτυπωτής είναι ενεργοποιημένος.
- ΣΦΑΛΜΑ: Illuminates or flashes to indicate an error condition (e.g., paper out, print head overheating, cutter error).
- ΧΑΡΤΙ: Indicates that the paper roll is low or out.
- Κουμπί FEED: Press to manually feed paper. Hold to perform a self-test print (if supported by model).
3.3 Βασική εκτύπωση
Once the printer is connected and drivers are installed, you can print receipts from your POS software or application. Ensure the printer is selected as the default or active printer in your system settings.
The printer supports various print speeds up to 300 mm/s and automatic paper cutting after each print job.
4. Συντήρηση
Η τακτική συντήρηση διασφαλίζει βέλτιστη απόδοση και παρατείνει τη διάρκεια ζωής του εκτυπωτή σας.
4.1 Καθαρισμός της κεφαλής εκτύπωσης
The print head should be cleaned regularly, especially if print quality degrades.
- Απενεργοποιήστε τον εκτυπωτή και αποσυνδέστε το καλώδιο τροφοδοσίας.
- Ανοίξτε το χάρτινο κάλυμμα.
- Χρησιμοποιήστε μια μπατονέτα ελαφρά dampened with isopropyl alcohol (ethanol) to gently wipe the thermal elements of the print head.
- Αφήστε την κεφαλή εκτύπωσης να στεγνώσει εντελώς πριν κλείσετε το κάλυμμα και επανασυνδέσετε την τροφοδοσία.
4.2 Cleaning the Cutter
Paper dust can accumulate around the cutter blade, affecting its performance.
- Απενεργοποιήστε τον εκτυπωτή και αποσυνδέστε το καλώδιο τροφοδοσίας.
- Carefully remove any visible paper dust or debris from around the cutter blade using a soft brush or compressed air.
- Do not use liquids on the cutter.
4.3 Γενικός καθαρισμός
Σκουπίστε το εξωτερικό του εκτυπωτή με ένα μαλακό,amp πανί. Αποφύγετε τη χρήση σκληρών χημικών ή λειαντικών καθαριστικών.
5. Αντιμετώπιση Προβλημάτων
Αυτή η ενότητα εξετάζει συνηθισμένα προβλήματα που ενδέχεται να αντιμετωπίσετε με τον εκτυπωτή σας.
| Πρόβλημα | Πιθανή αιτία | Διάλυμα |
|---|---|---|
| Ο εκτυπωτής δεν ενεργοποιείται. | Το καλώδιο τροφοδοσίας δεν είναι συνδεδεμένο. Η πρίζα είναι ελαττωματική. Ο διακόπτης τροφοδοσίας είναι απενεργοποιημένος. | Ensure power cable is securely connected. Test power outlet. Turn power switch to 'ON'. |
| Δεν υπάρχει εκτύπωση. | Paper out; Paper loaded incorrectly; Driver not installed or incorrect; USB cable loose; Printer not selected. | Load new paper roll. Re-load paper correctly. Install/reinstall correct driver. Check USB connection. Select printer in software. |
| ERROR light is on/flashing. | Paper out; Paper jam; Print head overheating; Cutter error. | Load paper. Clear paper jam. Allow printer to cool down. Check cutter for obstructions. |
| Κακή ποιότητα εκτύπωσης. | Dirty print head; Low quality paper; Old paper roll. | Clean the print head (see Section 4.1). Use high-quality thermal paper. Replace old paper rolls. |
Εάν το πρόβλημα επιμένει αφού επιχειρήσετε αυτές τις λύσεις, επικοινωνήστε με την υποστήριξη πελατών.
6. Προδιαγραφές
| Χαρακτηριστικό | Λεπτομέρεια |
|---|---|
| Μέθοδος Εκτύπωσης | Άμεση Θερμική |
| Πλάτος χαρτιού | 80 χλστ |
| Ταχύτητα εκτύπωσης | 230 mm/s, 260 mm/s, 300 mm/s |
| Διασύνδεση | USB |
| Διάστιχο | 3.75 mm (adjustable by commands) |
| Character Size (ANK) | Font A: 1.5 × 3.0 mm (12 × 24 dots) Font B: 1.1 × 2.1 mm (9 × 17 dots) |
| Character Size (Chinese/Traditional Chinese) | 3.0 × 3.0 mm (24 × 24 dots) |
| Τύποι γραμμωτού κώδικα | UPC-A / UPC-E / JAN13 (EAN13) / JAN8 (EAN8) / CODE39 / ITF / CODABAR / CODE93 / CODE128 |
| 2D Barcode | QR Code / PDF417 |
| NV Flash Memory | 256 KB |
| Ισχύς εισόδου | AC 100-240V, 50-60Hz |
| Ισχύς εξόδου | DC 24V/2.5A |
| Έξοδος συρταριού μετρητών | DC 24V/1A |
| Βάρος | 1.0 κιλά |
| Διαστάσεις (D × W × H) | 194.5 × 145 × 146.4 mm |
| Θερμοκρασία λειτουργίας | 0~45°C |
| Υγρασία λειτουργίας | 10~80% RH |
| Cutter Life | 1.5 εκατομμύριο περικοπές |
| Print Head Life | 150 χλμ |
| Συμβατότητα λειτουργικού συστήματος | Windows, Linux, Android, Mac |


