1. Εισαγωγή
This manual provides detailed instructions for the safe and effective use of the SMART SENSOR AS8805 Digital Sulfur Dioxide Gas Monitor. This device is designed for high-sensitivity detection of sulfur dioxide (SO2) gas, featuring sound and light alarms, and a rechargeable Li-battery for portable operation. Please read this manual thoroughly before operating the device and retain it for future reference.
2. Πληροφορίες Ασφάλειας
Να τηρείτε πάντα τις ακόλουθες προφυλάξεις ασφαλείας για να αποτρέψετε τραυματισμό ή ζημιά στη συσκευή:
- Μην επιχειρήσετε να τροποποιήσετε ή να αποσυναρμολογήσετε τη συσκευή.
- Βεβαιωθείτε ότι η συσκευή χρησιμοποιείται εντός των καθορισμένων εύρων θερμοκρασίας και υγρασίας λειτουργίας.
- Κρατήστε τη συσκευή μακριά από ισχυρά ηλεκτρομαγνητικά πεδία.
- Ελέγχετε τακτικά τη συσκευή για τυχόν σημάδια ζημιάς ή δυσλειτουργίας.
- Perform zero calibration in a clean air environment, free from SO2 or other interfering gases.
- Recharge the battery promptly when the low power indicator is active to maintain optimal performance and safety.
- This device is designed for detecting SO2 gas. Do not use it for other gas types without proper calibration and verification.
3. Το προϊόν τελείωσεview
The SMART SENSOR AS8805 is a compact and portable sulfur dioxide gas detector. Familiarize yourself with its components:

Εικόνα 3.1: Εμπρός View of the AS8805 Detector. This image shows the front of the device, highlighting the digital LCD display, power on/off key, up key (addition), down key (subtraction), and enter key. The alarm light is visible at the top left, and the sulfur dioxide gas sensor is at the top right.
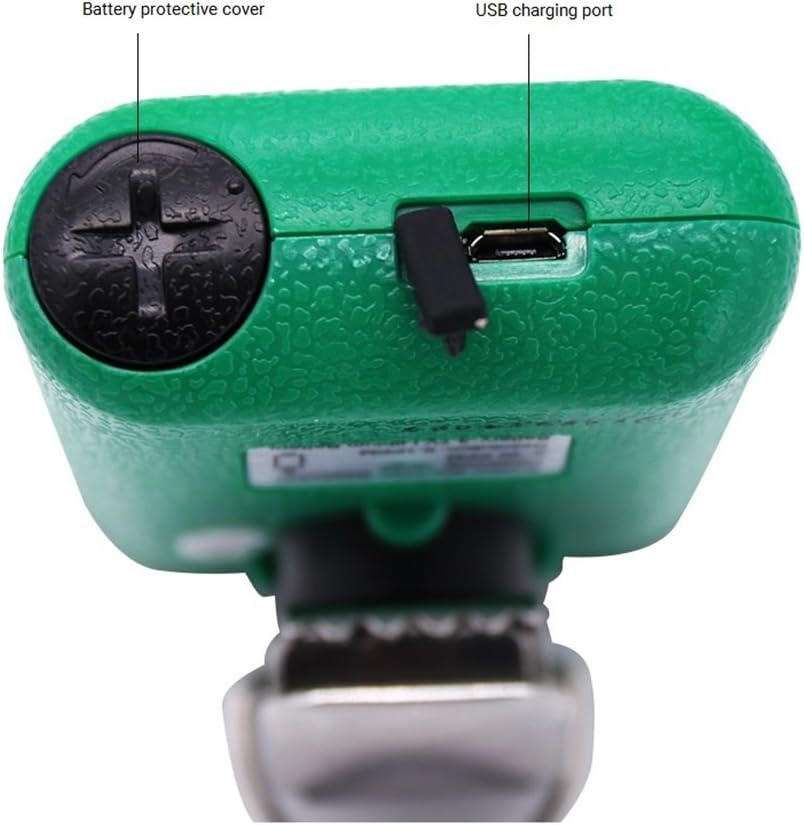
Εικόνα 3.2: Κορυφή View of the AS8805 Detector. This image displays the top section of the device, indicating the battery protective cover and the USB charging port.

Εικόνα 3.3: Πλευρά View of the AS8805 Detector. This image illustrates the side of the device, pointing out the gas sensor inside and the alarm light.
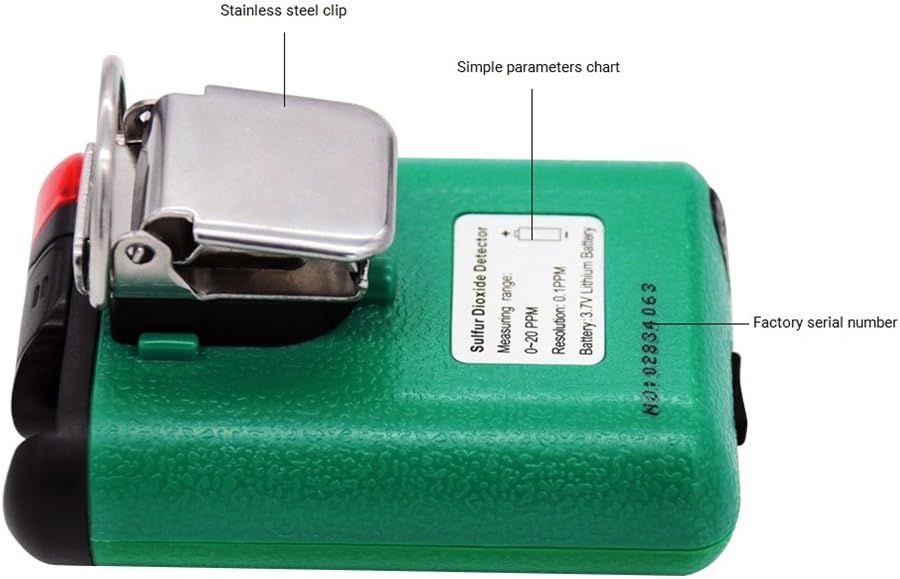
Εικόνα 3.4: Πίσω View of the AS8805 Detector. This image shows the back of the device, featuring the stainless steel clip, a simple parameters chart, and the factory serial number.
3.1 Βασικά εξαρτήματα
- Sulfur Dioxide Gas Sensor: Detects SO2 concentration in the air.
- Φως συναγερμού: Provides visual indication during an alarm event.
- Ψηφιακή οθόνη LCD: Shows real-time gas concentration, battery status, and other operational information.
- Πλήκτρο ενεργοποίησης/απενεργοποίησης: Χρησιμοποιείται για την ενεργοποίηση ή απενεργοποίηση της συσκευής.
- Up Key (Addition): Used for navigating menus or increasinτιμές g.
- Down Key (Subtraction): Used for navigating menus or decreasinτιμές g.
- Εισάγετε κλειδί: Χρησιμοποιείται για την επιβεβαίωση επιλογών ή την είσοδο σε μενού.
- Battery Protective Cover: Secures the internal battery.
- Θύρα φόρτισης USB: For recharging the device's internal Li-battery.
- Stainless Steel Clip: Allows for convenient carrying and attachment.
4. Ρύθμιση
4.1 Άνοιγμα συσκευασίας και περιεχόμενα συσκευασίας
Carefully unpack the device and verify that all standard accessories are present:

Σχήμα 4.1: Περιεχόμενα τυπικής συσκευασίας. This image shows the items included in the standard package: the AS8805 gas monitor, power charger and cable, user manual, explosive-proof certificate, certificate of calibration, and warranty card.
- 1x Sulfur Dioxide Gas Monitor (AS8805)
- 1x Εγχειρίδιο χρήστη
- 1x Explosive-proof Certificate
- 1x Κάρτα Εγγύησης
- 1x Power Charger
- 1x καλώδιο τροφοδοσίας
4.2 Φόρτιση της μπαταρίας
The device is powered by a 3.7V Li-battery. Before first use, or when the low power indicator appears, charge the device:
- Connect the provided power cable to the USB charging port on the top of the device (refer to Figure 3.2).
- Connect the other end of the cable to the power charger, and then plug the charger into a suitable power outlet.
- Το εικονίδιο της μπαταρίας στην οθόνη LCD θα υποδεικνύει την κατάσταση φόρτισης.
- A full charge typically allows for approximately 60 hours of continuous operation without alarms.
4.3 Αρχική ενεργοποίηση
Για να ενεργοποιήσετε τη συσκευή:
- Πατήστε και κρατήστε πατημένο το Πλήκτρο ενεργοποίησης/απενεργοποίησης μέχρι να φωτιστεί η οθόνη.
- The device will perform a self-test and warm-up sequence. During this time, the display may show various readings before settling.
5. Λειτουργία
5.1 Ενεργοποίηση/Απενεργοποίηση
- Ενεργοποίηση: Πατήστε και κρατήστε πατημένο το Πλήκτρο ενεργοποίησης/απενεργοποίησης for a few seconds until the display turns on.
- Απενεργοποιώ: Πατήστε και κρατήστε πατημένο το Πλήκτρο ενεργοποίησης/απενεργοποίησης for a few seconds until the display turns off.
5.2 Πληροφορίες οθόνης
The digital LCD display shows the following information:
- Real-time SO2 Concentration: Displayed in parts per million (ppm).
- Ένδειξη κατάστασης μπαταρίας: Δείχνει το τρέχον επίπεδο φόρτισης της μπαταρίας.
- Ενδείξεις συναγερμού: Visual cues for high or low alarm conditions.
5.3 Alarm Functions and Settings
The device features adjustable high and low alarm values with three alarm methods: sound, light, and vibration. The alarm sound can reach up to 80dB.
- Προεπιλεγμένος υψηλός συναγερμός: 10.0 ppm
- Προεπιλεγμένος χαμηλός συναγερμός: 5.0 ppm
To adjust alarm values:
- Με τη συσκευή ενεργοποιημένη, πατήστε το κουμπί Πάνω κλειδί or Κάτω κλειδί to enter the password interface.
- Enter the password (e.g., "123" as shown in the calibration video, though specific password should be confirmed in the full user manual). Use the Up και Down Keys to change digits and the Εισαγάγετε το κλειδί to move to the next digit or confirm.
- After entering the correct password, navigate through the menu using the Up και Down Keys to find the alarm setting options.
- Adjust the high and low alarm thresholds as required using the Up και Down Keys, and confirm each setting with the Εισαγάγετε το κλειδί.
5.4 Μηδενική βαθμονόμηση
Zero calibration ensures accurate readings by setting the baseline in a clean air environment. This procedure should be performed regularly or if you suspect inaccurate readings.
- Ensure the device is in a clean environment, free from any SO2 gas.
- Ενεργοποιήστε τη συσκευή.
- Access the calibration menu by pressing the Πάνω κλειδί or Κάτω κλειδί to enter the password interface.
- Enter the password (e.g., "123").
- After successful password entry, navigate to the calibration option (often labeled "CAL" or "ZERO CAL").
- Confirm the zero calibration selection with the Εισαγάγετε το κλειδί. The device will then perform the zero calibration, displaying a changing number as it stabilizes.
- Wait for the device to stabilize and confirm the calibration. The display may show "F" or return to 0.0 ppm, indicating successful calibration.
5.5 Auto/Hand Power Off Function
The device includes an auto power-off feature to conserve battery life. This can be set manually.
- Αυτόματη απενεργοποίηση: If enabled, the device will automatically turn off after 10 minutes of no operation.
- Refer to the full user manual for specific instructions on how to enable or disable the auto power-off function.
6. Συντήρηση
6.1 Φροντίδα μπαταρίας
- Recharge the 3.7V Li-battery when the low power indicator is displayed.
- Αποφύγετε την συχνή πλήρη εξάντληση της μπαταρίας για να παρατείνετε τη διάρκεια ζωής της.
- Χρησιμοποιήστε μόνο τον παρεχόμενο φορτιστή και καλώδιο.
6.2 Διάρκεια ζωής αισθητήρα
The electrochemical sensor has an estimated life of 2 years. After this period, the sensor's accuracy may degrade, and replacement or professional calibration may be required.
6.3 Καθαρισμός
- Σκουπίστε το εξωτερικό της συσκευής με ένα μαλακό,amp πανί.
- Μη χρησιμοποιείτε λειαντικά καθαριστικά ή διαλύτες.
- Βεβαιωθείτε ότι δεν εισέρχεται υγρό στο άνοιγμα του αισθητήρα ή στη θύρα φόρτισης.
7. Αντιμετώπιση Προβλημάτων
| Πρόβλημα | Πιθανή αιτία | Διάλυμα |
|---|---|---|
| Η συσκευή δεν ανάβει. | Χαμηλή ή εξαντλημένη μπαταρία. | Φορτίστε τη συσκευή χρησιμοποιώντας τον παρεχόμενο φορτιστή και το καλώδιο. |
| Ανακριβείς αναγνώσεις. | Sensor requires zero calibration; sensor lifespan exceeded. | Perform zero calibration in clean air. If issues persist, consider sensor replacement or professional service. |
| Ο συναγερμός ηχεί συνεχώς. | High SO2 concentration detected; alarm settings too low. | Evacuate the area and ventilate. Check and adjust alarm thresholds if necessary. |
| Η οθόνη είναι κενή ή παγωμένη. | Software error or battery issue. | Try restarting the device. If problem persists, contact support. |
8. Προδιαγραφές
| Χαρακτηριστικό | Λεπτομέρεια |
|---|---|
| Αριθμός μοντέλου προϊόντος | AS8805 |
| Gas Measurement Type | Διοξείδιο του θείου (SO2) |
| Εύρος μέτρησης | 0 ~ 20 ppm |
| Testing Resolution | 0.1 ppm |
| Αρχή μέτρησης | Ηλεκτροχημικά |
| Διάρκεια ζωής αισθητήρα | 2 χρόνια |
| Συναγερμός χαμηλού/υψηλού | Supported, adjustable values |
| Μέθοδοι συναγερμού | Ήχος, Φως, Δόνηση |
| Επίπεδο ήχου συναγερμού | Έως 80 dB |
| Θερμοκρασία λειτουργίας | -10 ~ 50 ℃ (14 ~ 122 ℉) |
| Υγρασία λειτουργίας | 15 ~ 95% RH (Standard) |
| Τύπος μπαταρίας | 3.7V Li-battery (754060p) |
| Χρόνος λειτουργίας μπαταρίας | Approx. 60 hours (no alarm) |
| Αυτόματη απενεργοποίηση | Yes (after 10 minutes of no operation, if enabled) |
| Καθαρό βάρος προϊόντος | 200 γραμμάρια (7.1 ουγγιές) |
| Μέγεθος προϊόντος | 120 * 65 * 38 χλστ |
| UPC | 785197913523 |
9. Εγγύηση και υποστήριξη
The SMART SENSOR AS8805 Digital Sulfur Dioxide Gas Monitor comes with a warranty as detailed in the included Warranty Card. Please refer to the card for specific terms and conditions.
For technical support, service, or inquiries regarding your device, please contact your retailer or the manufacturer directly. Keep your purchase receipt and warranty card handy when seeking support.