1. Εισαγωγή
The Bionik Tetra Power is a compact charging dock designed for Nintendo Switch Joy-Con controllers. It allows for simultaneous charging of up to four Joy-Con controllers, providing a convenient and organized charging solution. This manual provides essential information for the proper setup, operation, and maintenance of your Tetra Power charging dock.

Image 1.1: Bionik Tetra Power Charging Dock in its retail packaging. The packaging highlights its ability to charge four Joy-Con controllers and its compatibility with Nintendo Switch.
Βασικά Χαρακτηριστικά:
- Συμπαγής σχεδιασμός: Unique cross formation allows simultaneous charging of up to four Joy-Con controllers without occupying excessive space.
- Ολοκληρωμένη διαχείριση καλωδίων: Features a built-in system for adjusting and storing the charging cable, promoting a tidy setup.
- LED Charge Status Indicators: Provides clear visual feedback on the charging status of each connected Joy-Con controller.
- Αισθητική Ενσωμάτωση: Designed to complement the visual style of the Nintendo Switch console.
2. Οδηγίες εγκατάστασης
- Αποσυσκευάστε τη Συσκευή: Carefully remove the Bionik Tetra Power charging dock from its packaging.
- Σύνδεση στο Power: The charging dock features a built-in USB cable. Connect this USB cable to an available USB port on your Nintendo Switch dock or to a compatible USB power adapter (not included).

Image 2.1: The Bionik Tetra Power charging dock viewed from the side, showing its integrated USB cable for power connection.
- Διαχείριση καλωδίων: Utilize the built-in cable management system located at the base of the dock to adjust the cable length and store any excess, ensuring a neat setup.
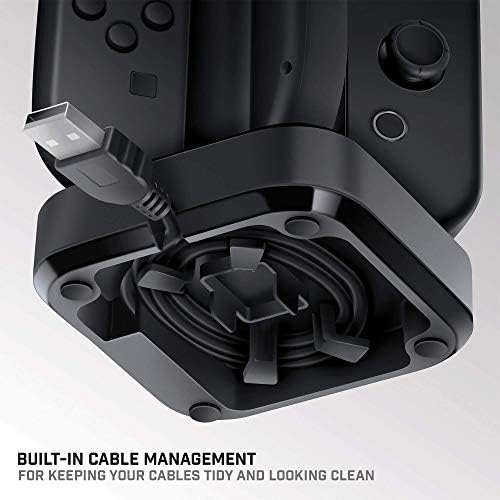
Image 2.2: The underside of the Tetra Power dock, illustrating the integrated cable management system for organizing the USB cable.
- Τοποθέτηση: Place the charging dock on a stable, flat surface near your Nintendo Switch console for convenient access.
3. Οδηγίες λειτουργίας
Charging Joy-Con Controllers:
- Ensure the Tetra Power charging dock is connected to a power source.
- Align a Joy-Con controller with one of the four charging slots on the dock. Gently slide the Joy-Con downwards until it clicks into place and makes contact with the charging pins.
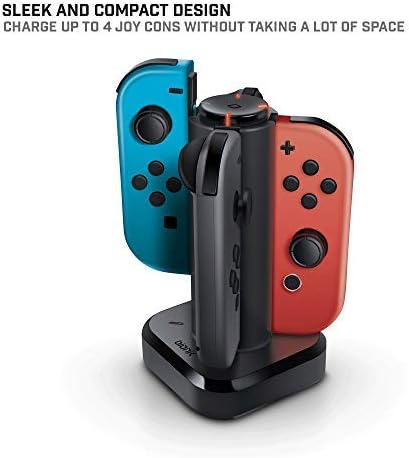
Image 3.1: The Tetra Power charging dock with two Nintendo Switch Joy-Con controllers inserted into their respective charging slots.
- Repeat for additional Joy-Con controllers, up to a maximum of four.
LED Charge Status Indicators:
Each charging slot is equipped with an LED indicator to display the charging status of the connected Joy-Con controller:
- Κόκκινο LED: Indicates that the Joy-Con controller is currently charging.
- Πράσινο LED: Indicates that the Joy-Con controller is fully charged.
- Χωρίς LED: Indicates no Joy-Con is connected or the dock is not receiving power.
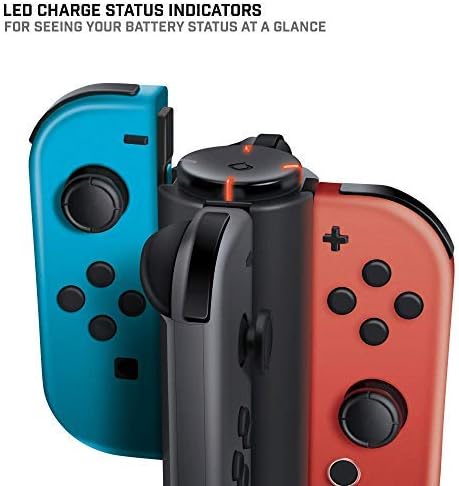
Εικόνα 3.2: Κοντινό πλάνο view of the LED charge status indicators on the Tetra Power dock, showing the illuminated status lights.
4. Συντήρηση
- Καθάρισμα: Disconnect the charging dock from its power source before cleaning. Use a soft, dry cloth to wipe the exterior surfaces. Avoid using abrasive cleaners, solvents, or harsh chemicals.
- Αποθήκευση: Όταν δεν χρησιμοποιείτε τη βάση φόρτισης για μεγάλα χρονικά διαστήματα, αποθηκεύστε τη σε δροσερό και ξηρό μέρος, μακριά από το άμεσο ηλιακό φως και τις ακραίες θερμοκρασίες.
- Χειριζόμενος: Χειριστείτε τη συσκευή με προσοχή. Αποφύγετε να την ρίξετε κάτω ή να την υποβάλετε σε ισχυρά χτυπήματα, τα οποία θα μπορούσαν να προκαλέσουν ζημιά στα εσωτερικά εξαρτήματα.
5. Αντιμετώπιση Προβλημάτων
- Joy-Con not charging:
- Ensure the charging dock is properly connected to a powered USB port.
- Verify that the Joy-Con controller is correctly seated in the charging slot and making full contact with the charging pins.
- Check if the USB cable is securely connected to both the dock and the power source.
- Try connecting the dock to a different USB port or power adapter.
- Η ενδεικτική λυχνία LED δεν ανάβει:
- Confirm the charging dock is receiving power.
- Ensure a Joy-Con controller is properly inserted into the slot.
- If the Joy-Con is fully charged, the LED will be green. If no Joy-Con is present, the LED will be off.
6. Προδιαγραφές
| Αριθμός μοντέλου | BNK-9019 |
| Μάρκα | Bionik |
| Διαστάσεις προϊόντος | 6.1 x 4.1 x 3.9 ίντσες |
| Βάρος αντικειμένου | 6.4 ουγγιές |
| Συμβατές Συσκευές | Nintendo Switch Joy-Con Controllers |
| Τύπος σύνδεσης | Mini USB (integrated cable) |
| Είσοδος Voltage | 5.4 Volt |
| Ampοργή | 5 Amps |
| Σύνολο θυρών USB | 4 (for Joy-Cons) |
| Ειδικό χαρακτηριστικό | Fast Charging, LED Charge Status Indicators, Cable Management |
7. Εγγύηση και υποστήριξη
Bionik products are manufactured with quality and reliability in mind. For specific warranty information, product support, or to register your product, please visit the official Bionik webστον ιστότοπο ή επικοινωνήστε απευθείας με την εξυπηρέτηση πελατών. Κρατήστε την απόδειξη αγοράς σας ως απόδειξη αγοράς για τυχόν αξιώσεις εγγύησης.
Κατασκευαστής: Bionik
Webτοποθεσία: bionikgaming.com

Image 7.1: The back of the Tetra Power retail box, displaying multilingual features, specifications, and manufacturer contact details including the webτοποθεσία.


