1. Εισαγωγή
The COMPUTHERM Q7RF wireless room thermostat is designed for precise control of heating and air conditioning systems. This programmable device allows you to set individual temperature schedules for each day of the week, optimizing comfort and energy efficiency in your home or office. Its wireless design offers flexible placement of the thermostat unit, while the receiver unit connects directly to your boiler or air conditioning system, compatible with both 24V and 230V control circuits.
2. Περιεχόμενα συσκευασίας
Βεβαιωθείτε ότι όλα τα εξαρτήματα υπάρχουν στη συσκευασία σας:
- 4 x COMPUTHERM Q7RF Room Thermostat (Transmitter Unit)
- 4 x COMPUTHERM Q7RF Receiver Unit
- Εγχειρίδιο χρήστη (αυτό το έγγραφο)
- Βίδες στερέωσης και βύσματα τοίχου
3. Το προϊόν τελείωσεview
The COMPUTHERM Q7RF system consists of two main components: the thermostat unit (transmitter) and the receiver unit. The thermostat unit measures the room temperature and allows you to set desired temperatures and programs. The receiver unit connects to your heating or cooling system and switches it on or off based on signals from the thermostat unit.

Εικόνα 1: Τέλοςview of the COMPUTHERM Q7RF 4-piece set, showing multiple thermostat and receiver units.
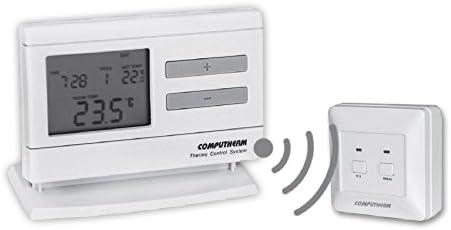
Figure 2: A single COMPUTHERM Q7RF thermostat unit communicating wirelessly with its receiver unit.
3.1 Thermostat Unit (Transmitter)
- Οθόνη LCD: Shows current temperature, set temperature, time, day, and program status.
- Κουμπιά ελέγχου: For setting temperature, time, and programming schedules.
- Χώρος μπαταρίας: Για παροχή ρεύματος.
3.2 Μονάδα δέκτη
- Τερματικά καλωδίωσης: For connection to the heating/cooling system.
- Δείκτες κατάστασης: LEDs to show power and relay status.
- Manual Override Buttons: For temporary manual control.
4. Προδιαγραφές
| Χαρακτηριστικό | Προσδιορισμός |
|---|---|
| Μάρκα | ΥΠΟΛΟΓΙΣΤΙΚΗ |
| Μοντέλο | Q7RF |
| Εναλλαγή Voltage | 24V AC/DC, ... 250V AC, 50Hz |
| Κατανάλωση ρεύματος | 6W |
| Εύρος μέτρησης θερμοκρασίας | 3 – 45°C (in 0.1°C increments) |
| Ρυθμιζόμενο εύρος θερμοκρασίας | 5 – 40°C (in 0.5°C increments) |
| Ακρίβεια μέτρησης θερμοκρασίας | ±0.5°C |
| Τύπος ελεγκτή | Πιέστε το κουμπί |
| Τεχνολογία Συνδεσιμότητας | Wireless (Radio Frequency) |
| Ειδικά Χαρακτηριστικά | Programmable, Compatible with various system voltages |
5. Ρύθμιση και εγκατάσταση
5.1 Thermostat Unit Placement and Battery Installation
- Επιλέξτε τοποθεσία: Place the thermostat unit in a central area of the room where it can accurately measure the ambient temperature, away from direct sunlight, drafts, or heat sources.
- Εγκατάσταση μπαταριών: Open the battery compartment on the back of the thermostat unit. Insert the required batteries (typically AA or AAA, refer to the unit's markings) ensuring correct polarity. Close the compartment.
- Ενεργοποίηση: The display should light up, indicating the unit is powered.
5.2 Receiver Unit Wiring
WARNING: Electrical installation should only be performed by a qualified electrician. Disconnect power to the heating/cooling system before proceeding.
- Τοποθετήστε τον δέκτη: Secure the receiver unit near your boiler or air conditioning system using the provided screws and wall plugs.
- Access Wiring Terminals: Open the cover of the receiver unit to expose the wiring terminals.
- Σύνδεση στο σύστημα: Connect the receiver unit to the two-wire room thermostat connection point of your boiler or AC system. Ensure connections are secure and follow the wiring diagram provided with your heating/cooling system and the receiver unit. The COMPUTHERM Q7RF is compatible with both 24V and 230V control circuits.
- Επαναφορά ισχύος: Once wiring is complete and verified, close the receiver unit cover and restore power to your heating/cooling system.
5.3 Pairing the Units (If not pre-paired)
Refer to the specific instructions provided with your Q7RF set for pairing procedures. Typically, this involves pressing a pairing button on the receiver unit and then initiating a pairing sequence on the thermostat unit within a short timeframe. A successful pairing will usually be indicated by an LED on the receiver or a message on the thermostat display.
6. Οδηγίες λειτουργίας
6.1 Κατανόηση της οθόνης LCD
The LCD display provides all necessary information about the thermostat's current status and settings.

Εικόνα 3: Αναλυτικά view of the COMPUTHERM Q7RF LCD display, illustrating various indicators such as program number, manual modification symbol, weekdays, time, set temperature, actual room temperature, low battery symbol, boiler ON state, and timed control symbol.
- Εργάσιμες: Υποδεικνύει την τρέχουσα ημέρα της εβδομάδας.
- Exact Time / Time Left: Displays the current time or time remaining for a manual modification.
- Αριθμός προγράμματος: Shows the active program segment.
- Ρύθμιση θερμοκρασίας: The desired temperature set by the user.
- Actual Room Temperature: The current temperature measured by the thermostat.
- Symbol for Manual Modification: Indicates that the thermostat is currently operating under a temporary manual override.
- Temp. Modified until next manual intervention: Shows the duration of a temporary temperature change.
- Symbol for Low Battery Voltage: Εμφανίζεται όταν χρειάζονται αντικατάσταση οι μπαταρίες.
- Symbol for Boiler ON State: Indicates when the heating/cooling system is active.
- Symbol for Timed Control: Indicates that a programmed schedule is active.
6.2 Ρύθμιση τρέχουσας ώρας και ημέρας
- Πατήστε το ΦΟΡΑ κουμπί.
- Χρησιμοποιήστε το + or - κουμπιά για να ρυθμίσετε την ώρα και, στη συνέχεια, πατήστε ΦΟΡΑ και πάλι για επιβεβαίωση.
- Επαναλάβετε για λεπτά και ημέρα της εβδομάδας.
6.3 Χειροκίνητη ρύθμιση θερμοκρασίας
- Στην κανονική λειτουργία, πατήστε το κουμπί + or - κουμπιά για να ρυθμίσετε την επιθυμητή θερμοκρασία.
- The new temperature will be maintained until the next programmed time slot or until manually overridden again.
6.4 Programming Daily/Weekly Schedules
The Q7RF allows for independent programming for each day of the week. You can typically set multiple time periods with different temperatures for each day.
- Πατήστε το ΕΠΑΙΤΩ κουμπί για είσοδο σε λειτουργία προγραμματισμού.
- Χρησιμοποιήστε το ΗΜΕΡΑ button to select the day you wish to program (e.g., MON, TUE, etc.).
- Χρησιμοποιήστε το ΦΟΡΑ και +/- buttons to set the start time for the first program period.
- Χρησιμοποιήστε το ΡΥΘΜΙΣΗ ΣΥΜΒΟΥΛΗΣ και +/- buttons to set the desired temperature for this period.
- Τύπος ΕΠΑΙΤΩ again to move to the next program period for the same day, or use ΗΜΕΡΑ για να προχωρήσουμε στην επόμενη μέρα.
- Repeat until all desired periods and days are programmed.
- Πατήστε το ΤΡΕΞΙΜΟ or EXIT button to save and exit programming mode.
7. Συντήρηση
7.1 Αντικατάσταση μπαταρίας
When the low battery symbol appears on the LCD display, replace the batteries immediately to ensure continuous operation. Use new, high-quality alkaline batteries of the specified type.
- Open the battery compartment cover on the back of the thermostat unit.
- Αφαιρέστε τις παλιές μπαταρίες.
- Τοποθετήστε καινούργιες μπαταρίες, τηρώντας τη σωστή πολικότητα (+/-).
- Κλείστε το κάλυμμα της θήκης μπαταριών.
7.2 Καθαρισμός
Clean the thermostat and receiver units with a soft, dry cloth. Do not use abrasive cleaners, solvents, or spray directly onto the units, as this may damage the electronics or finish.
8. Αντιμετώπιση Προβλημάτων
| Πρόβλημα | Πιθανή αιτία | Διάλυμα |
|---|---|---|
| Η οθόνη του θερμοστάτη είναι κενή | Πεσμένες μπαταρίες | Αντικαταστήστε τις μπαταρίες με καινούργιες. |
| Το σύστημα θέρμανσης/ψύξης δεν ανταποκρίνεται | 1. Receiver unit not powered 2. Units not paired 3. Wiring issue 4. Εκτός εμβέλειας | 1. Check power supply to receiver. 2. Perform pairing procedure (Section 5.3). 3. Verify wiring connections (Section 5.2). 4. Move thermostat closer to receiver or check for obstructions. |
| Λανθασμένη ένδειξη θερμοκρασίας | Thermostat placed in unsuitable location (direct sun, draft) | Μετακινήστε τον θερμοστάτη σε μια πιο κεντρική και σταθερή περιοχή θερμοκρασίας. |
| Programmed schedule not active | Thermostat in manual override mode | Exit manual override mode (e.g., press RUN/AUTO button) to resume programmed operation. |
9. Εγγύηση και υποστήριξη
COMPUTHERM products are manufactured to high-quality standards. For warranty information, please refer to the warranty card included with your product or contact your retailer. For technical support, please reach out to the COMPUTHERM customer service or your local distributor. Keep your purchase receipt as proof of purchase.