1. Εισαγωγή
This manual provides instructions for the installation, configuration, and operation of your ASUS RT-N13U Wireless-N Router. The RT-N13U is a versatile networking device capable of functioning as a wireless router, an access point, or a wireless repeater. It also features a USB 2.0 port for enhanced functionalities such as printer sharing, FTP hosting, network storage, and direct BitTorrent downloading.
Διαβάστε προσεκτικά αυτό το εγχειρίδιο πριν χρησιμοποιήσετε τη συσκευή για να διασφαλίσετε τη σωστή ρύθμιση και τη βέλτιστη απόδοση.
2. Το προϊόν τελείωσεview
2.1 Βασικά χαρακτηριστικά
- EZ All-in-One Printer Sharing: Utilize the USB port to share a printer across your network.
- EZ Switch: Easily switch between Router, Repeater, and Access Point modes with a single touch.
- Enhanced Download Master: Λήψη files directly to a connected USB hard drive even when your computer is off.
- Wireless-N Connectivity: Supports 802.11b/g/n standards for high-speed wireless networking.
- 4 LAN Ports: Provides four 10/100 Mbps Ethernet ports for wired connections.
- Diagnostic and Bandwidth Management Tools: Includes Dr. Surf and EZQoS for network monitoring and quality of service management.
2.2 Περιεχόμενα συσκευασίας
- ASUS RT-N13U Wireless-N Router
- Μετασχηματιστής ρεύματος
- Καλώδιο Ethernet
- Οδηγός γρήγορης εκκίνησης
- Support CD (containing user manual and utilities)
2.3 Διεπαφή υλικού
Familiarize yourself with the ports, buttons, and LED indicators on your RT-N13U router.
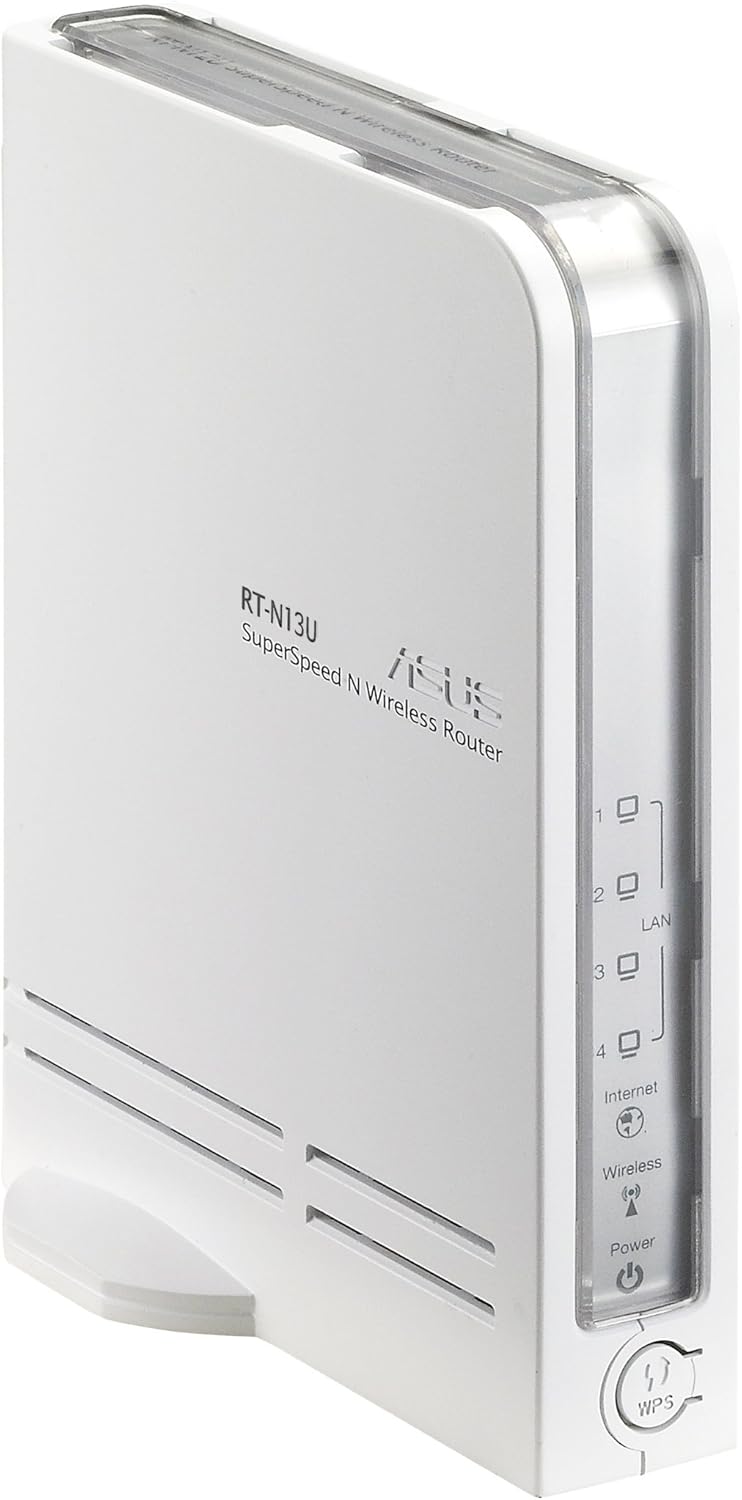
Εικόνα 1: Μπροστά και Πλαϊνά View of the ASUS RT-N13U Router. This image shows the front panel with LED indicators for Power, Wireless, Internet, and LAN ports (1-4), along with the WPS button.

Εικόνα 2: Οπισθεν View of the ASUS RT-N13U Router. This image displays the rear panel, including the USB 2.0 port, four LAN ports (yellow), one Internet (WAN) port (blue), and the power input port.
Ενδείξεις LED:
- LED ισχύος: Indicates power status. Solid green for normal operation.
- Ασύρματο LED: Indicates wireless activity. Blinks when data is being transmitted wirelessly.
- LED Internet: Indicates internet connection status. Solid green for connected, blinking for activity.
- LAN 1-4 LEDs: Indicate activity on the respective LAN ports. Solid green for connected, blinking for activity.
- WPS LED: Indicates Wi-Fi Protected Setup status.
Θύρες και κουμπιά:
- Θύρα USB 2.0: For connecting USB devices such as printers or external storage.
- Θύρες LAN (1-4): Connect wired devices like computers or gaming consoles.
- Θύρα Διαδικτύου (WAN): Συνδέεται με το μόντεμ σας για πρόσβαση στο διαδίκτυο.
- Θύρα ισχύος: Συνδέεται στον παρεχόμενο προσαρμογέα ρεύματος.
- Κουμπί WPS: Initiates Wi-Fi Protected Setup for easy wireless connection.
- Κουμπί επαναφοράς: (Typically a small pinhole button) Used to restore factory default settings.
- EZ Switch: A physical switch to change the device's operating mode (Router, AP, Repeater).
3. Ρύθμιση
3.1 Αρχική σύνδεση υλικού
- Connect the power adapter to the router's Power port and plug it into a power outlet.
- Connect one end of the Ethernet cable to the Internet (WAN) port of the RT-N13U and the other end to your modem's Ethernet port.
- (Optional) For initial configuration, connect your computer directly to one of the LAN ports (1-4) on the router using an Ethernet cable.
- Power on your modem, then power on the RT-N13U router. Wait for the Power, Internet, and Wireless LEDs to stabilize.
3.2 Configuration Modes
The RT-N13U supports three operating modes, selectable via the EZ Switch:
- Λειτουργία δρομολογητή: The default mode, where the device acts as a gateway for your network, providing internet access and managing local network traffic.
- Λειτουργία σημείου πρόσβασης (AP): Extends an existing wired network by adding wireless connectivity. In this mode, internet features are typically disabled, and the device acts as a wireless hub.
- Λειτουργία επαναλήπτη: Extends the range of an existing wireless network by receiving and re-transmitting the wireless signal.
Select the desired mode using the physical EZ Switch on the router before proceeding with software configuration.
3.3 Web Πρόσβαση διεπαφής
- Ανοίξτε α web browser (e.g., Chrome, Firefox, or IE8/Edge; IE9 beta may have compatibility issues).
- Στη γραμμή διευθύνσεων, πληκτρολογήστε την προεπιλεγμένη διεύθυνση IP του δρομολογητή (συνήθως
192.168.1.1orrouter.asus.com) και πατήστε Enter. - Εισαγάγετε το προεπιλεγμένο όνομα χρήστη και τον κωδικό πρόσβασης (συνήθως
adminfor both). Refer to the label on the bottom of your router if these defaults do not work. - Follow the on-screen setup wizard.
3.4 Internet Connection Setup (Router Mode)
If the EZ UI setup feature does not automatically configure your internet connection, manual steps may be required, especially for certain Internet Service Providers (ISPs).
- Συγκεντρώστε πληροφορίες:
- Your computer's MAC address (Physical Address). On Windows, open Command Prompt and type
ipconfig /all. - Your ISP's DNS server addresses. If connected via Ethernet, use
ipconfig /allto find "DNS Servers".
- Your computer's MAC address (Physical Address). On Windows, open Command Prompt and type
- Access Network Map: Στο ρούτερ web interface, navigate to the "Network Map" or "EZ-UI" section.
- Χειροκίνητη διαμόρφωση: If the connection fails, the system may prompt for manual configuration.
- Χρησιμοποιήστε το MAC κλώνος feature. Some ISPs tie your internet service to a specific MAC address. Cloning your computer's MAC address to the router can resolve connectivity issues.
- Manually enter your ISP's DNS server addresses if required.
- Apply Settings and Restart: Apply the new settings. The router will restart. Your computer may temporarily lose connection. Reconnect to the router.
- Power Cycle (If Needed): If the internet connection is still not established:
- Power off the wireless router.
- Power off your modem/ISP's box.
- Περιμένετε 5 λεπτά.
- First, power on the modem/ISP's box and wait for it to fully boot.
- Then, power on the ASUS RT-N13U router.
- Check for internet connectivity.
Note: For optimal wireless performance, ensure the wireless radio is set to "N only" mode in the router's settings if all your devices support 802.11n.
4. Λειτουργία
4.1 Σύνδεση συσκευών
Ενσύρματες συνδέσεις:
Connect Ethernet-enabled devices (e.g., desktop computers, smart TVs, gaming consoles) to the yellow LAN ports (1-4) on the back of the router using Ethernet cables.
Ασύρματες συνδέσεις:
- On your wireless device (laptop, smartphone, tablet), search for available Wi-Fi networks.
- Select the network name (SSID) of your ASUS RT-N13U (default SSID is usually "ASUS" or "ASUS_RT-N13U").
- Enter the network security key (password). This can be found on a label on the router or in the router's web διεπαφή.
- Alternatively, press the WPS button on the router and then activate WPS on your wireless device within two minutes for a quick connection.
4.2 Χαρακτηριστικά USB
The USB 2.0 port on the RT-N13U provides additional functionalities:
Κοινή χρήση εκτυπωτή:
Connect a compatible USB printer to the USB 2.0 port. Configure printer sharing through the router's web interface to allow multiple computers on your network to print to it.
Download Master:
Connect a USB storage device (e.g., external hard drive, flash drive) to the USB 2.0 port. The Download Master feature allows you to initiate downloads (including BitTorrent) directly to the connected storage device, even when your computer is turned off. This feature typically works only when the router is in Router Mode.
Note: Ensure the USB storage device is formatted correctly and recognized by the router. For BitTorrent downloads, you may need to provide the exact URL location for the downloader to function properly.
5. Συντήρηση
5.1 ενημερώσεις υλικολογισμικού
Regularly updating the router's firmware is crucial for performance improvements, security enhancements, and bug fixes. Visit the official ASUS support website for the RT-N13U model to download the latest firmware. Follow the instructions provided with the firmware update package carefully to avoid damaging the device.
Note: Firmware updates can resolve many common issues and improve compatibility with various devices and services.
5.2 Επαναφορά εργοστασιακών προεπιλογών
If you encounter persistent issues or forget your login credentials, you can restore the router to its factory default settings. This will erase all custom configurations.
- With the router powered on, locate the Reset button (often a small pinhole) on the device.
- Χρησιμοποιήστε έναν συνδετήρα ή ένα παρόμοιο αιχμηρό αντικείμενο για να πατήσετε παρατεταμένα το κουμπί Επαναφοράς για περίπου 5-10 δευτερόλεπτα.
- Release the button when the Power LED starts blinking rapidly or all LEDs briefly flash.
- The router will restart with factory default settings. You will need to reconfigure it from scratch.
6. Αντιμετώπιση Προβλημάτων
6.1 Κοινά ζητήματα και λύσεις
- Δεν υπάρχει σύνδεση στο διαδίκτυο:
- Check all cable connections (modem to router WAN port, router to computer LAN port).
- Perform a power cycle on both your modem and router (unplug, wait 5 minutes, plug modem first, then router).
- Verify your ISP settings in the router's web interface, especially if MAC cloning or specific DNS servers are required.
- Ensure the router is in the correct operating mode (Router Mode for internet access).
- Δεν είναι δυνατή η πρόσβαση στο δρομολογητή Web Διεπαφή:
- Βεβαιωθείτε ότι ο υπολογιστής σας είναι συνδεδεμένος στο δρομολογητή (ενσύρματα ή ασύρματα).
- Verify the IP address (e.g.,
192.168.1.1) is correct. - Δοκιμάστε ένα διαφορετικό web πρόγραμμα περιήγησης.
- Απενεργοποιήστε προσωρινά οποιοδήποτε τείχος προστασίας ή λογισμικό προστασίας από ιούς στον υπολογιστή σας.
- Εάν ξεχάσατε τον κωδικό πρόσβασης, πραγματοποιήστε επαναφορά εργοστασιακών ρυθμίσεων (βλ. Ενότητα 5.2).
- Χαμηλή ταχύτητα ασύρματου δικτύου ή διακοπή συνδέσεων:
- Βεβαιωθείτε ότι το υλικολογισμικό του δρομολογητή είναι ενημερωμένο.
- Check for wireless interference from other devices (cordless phones, microwaves).
- Adjust the wireless channel in the router settings.
- Position the router in a central location, away from obstructions.
- If all devices support 802.11n, set the wireless mode to "N only" for higher speeds.
- Η συσκευή USB δεν αναγνωρίζεται:
- Ensure the USB device is properly connected and powered (if external power is required).
- Ελέγξτε το δρομολογητή web interface for USB device status and configuration.
- Verify compatibility of the USB device with the router.
- Ensure the router is in Router Mode for USB features like Download Master.
6.2 Σημασίες ενδεικτικής λυχνίας LED
| Ένδειξη LED | Κατάσταση | Περιγραφή |
|---|---|---|
| Εξουσία | Συμπαγές πράσινο | Η συσκευή είναι ενεργοποιημένη και λειτουργεί κανονικά. |
| Μακριά από | Η συσκευή είναι απενεργοποιημένη. | |
| Ασύρματος | Συμπαγές πράσινο | Η ασύρματη λειτουργία είναι ενεργοποιημένη. |
| Αναβοσβήνει πράσινο | Wireless data transmission is active. | |
| Internet | Συμπαγές πράσινο | Συνδεδεμένο στο Διαδίκτυο. |
| Αναβοσβήνει πράσινο | Internet data transmission is active. | |
| Μακριά από | Δεν υπάρχει σύνδεση στο Διαδίκτυο. | |
| LAN 1-4 | Συμπαγές πράσινο | Μια συσκευή είναι συνδεδεμένη στην αντίστοιχη θύρα LAN. |
| Αναβοσβήνει πράσινο | Data transmission is active on the corresponding LAN port. | |
| WPS | Αναβοσβήνει | WPS connection process is active. |
7. Προδιαγραφές
| Χαρακτηριστικό | Λεπτομέρεια |
|---|---|
| Όνομα μοντέλου | RT-N13U |
| πρότυπο ασύρματης | 802.11b/g/n |
| Ζώνη συχνότητας | Μονή ζώνη (2.4 GHz) |
| Τεχνολογία Συνδεσιμότητας | Ασύρματο, Ethernet |
| Θύρες Ethernet | 4 x 10/100 Mbps LAN, 1 x 10/100 Mbps WAN |
| Θύρα USB | 1 x USB 2.0 |
| Τύπος κεραίας | Εσωτερικός |
| Ειδικά Χαρακτηριστικά | Access Point Mode, Repeater Mode, WPS, Printer Sharing, Download Master |
| Διαστάσεις προϊόντος | 10 x 8.88 x 3.75 ίντσες |
| Βάρος αντικειμένου | 5.3 ουγγιές (περίπου 150 γραμμάρια) |
| Κατασκευαστής | ASUS |
| Ημερομηνία πρώτης διαθεσιμότητας | 28 Σεπτεμβρίου 2009 |
8. Πληροφορίες Ασφάλειας
- Use only the power adapter provided with the device. Using an incompatible adapter may damage the device and void your warranty.
- Μην εκθέτετε τη συσκευή σε νερό, υγρασία ή ακραίες θερμοκρασίες.
- Τοποθετήστε τη συσκευή σε καλά αεριζόμενο χώρο για να αποφύγετε την υπερθέρμανση.
- Μην ανοίγετε τη συσκευή casinζ. Η συντήρηση πρέπει να εκτελείται μόνο από εξουσιοδοτημένο προσωπικό.
- Κρατήστε τη συσκευή μακριά από ισχυρά ηλεκτρομαγνητικά πεδία.
9. Εγγύηση και υποστήριξη
For warranty information, technical support, and further assistance, please visit the official ASUS support website or contact ASUS customer service. Details can typically be found on the ASUS webστον ιστότοπο ή στην τεκμηρίωση που συνοδεύει το προϊόν σας.
Υποστήριξη ASUS Webτοποθεσία: www.asus.com/support/


